5 spectacular Japanese joints
Learn how these joints go together and why they were used

In my article “Japanese Joinery in Practice” (FWW #292), I illustrate and explain various joints used by traditional Japanese carpenters. There are numerous joints used throughout the country and its history. After all, carpenters must weigh many factors when picking the right joint for the job. Structural function is foremost, since these timbers need to support structures from simple outbuildings to large temples. But aesthetics also play a role, especially when it comes to hiding a joint and end grain. The results are often more labor intensive, and therefore less common. Still, these examples offer insight into carpenters’ ingenuity and skill. To expand on the article’s offerings, here are some of these more complex, lesser used options.
Osaka Castle’s Otemon Gate Repair
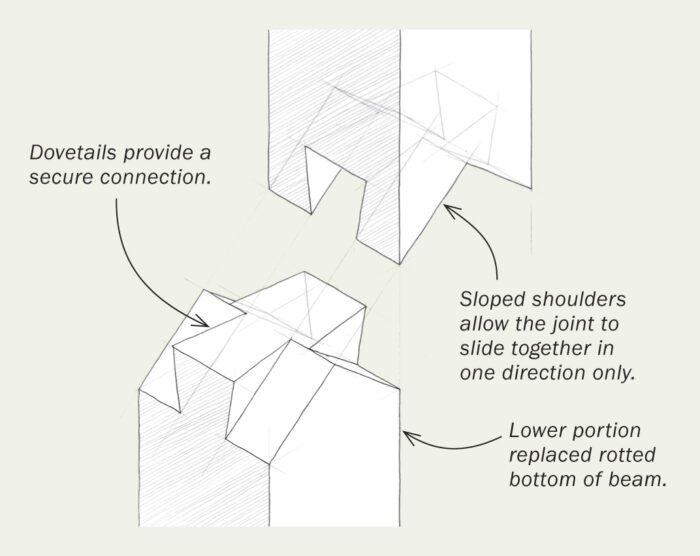
As Japanese temple carpentry shifted from building temples to repairing them, carpenters came up with elaborate methods to show off their skills and outdo each other. Seemingly impossible joints, like those in posts that are likely to rot and decay from the bottom, where they are most exposed to moisture, came out of this desire to intrigue and outdo other carpenters. Hence this joint—the only known example of its time—in Osaka Castle’s Otemon Gate, which researchers X-rayed to examine its interior anatomy. Two faces with dovetails on opposing sides and two mountain shapes are visible when the joint is together. The sloped shoulders inside are the key to assembly, as they allow the lower, repair piece to slide into the upper after the damage was cut away and the joint cut there.
Mechigai Koshiire Kama Tsugi
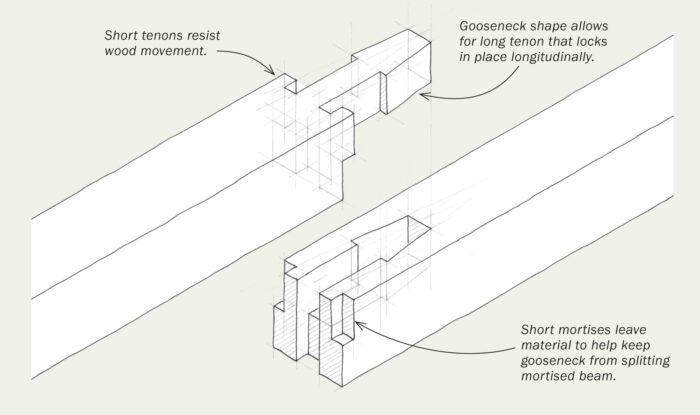
Stepped gooseneck scarf with stub tenons
This, like the koshikake ari tsugi, is used to connect ground sills. It’s a stronger connection, but it is not often used because of the time required to make it. It is a combination of a lap joint and a gooseneck tenon joint, each occupying half the thickness of the timber. The mechigai, or stub mortise-and-tenon on either side of the gooseneck tenon, is good for resisting strain and twist as the timbers dry and shrink. It also prevents the walls of the gooseneck mortise from widening when the tenon is inserted.
Konozu Zashi
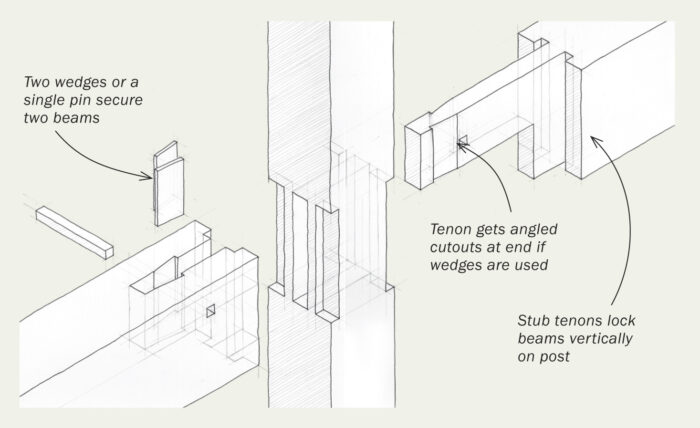
Double plug scarf joint
This kind of joint, used to splice beams intersecting a column, is found mostly in high-grade work. The notches, shoulders, and housings all counteract any shearing or twisting forces, while the square pin and keys are driven in to both lock the joint and increase its tensile strength. To assemble it, the beam with the tenon is inserted first, then the mortised beam is slid in place. The keys are finally installed into angled mortises shared between the tenon and mortised beam, securing the assembly. The offset tenon means the three visible surfaces, below the joint, don’t reveal the joint. This joint is best made out of hardwood because of the considerable material removed, especially from the post.
Ashikatame Beam Joint
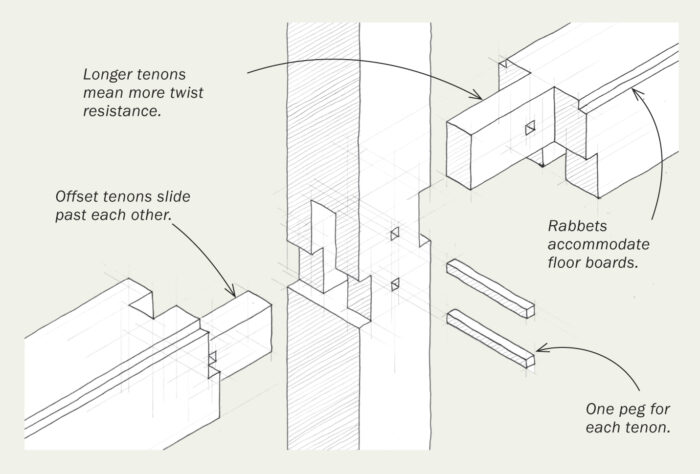
An ashikatame beam connects posts and beams where you don’t have a continuous ground sill to support the loads on the floor. The long tenons slide over and past each other, increasing contact surface and therefore resistance to twist. The beams are secured to the column with two square hardwood pins. The rabbet running along the beams accepts flooring boards.
Shiribasami Tsugi
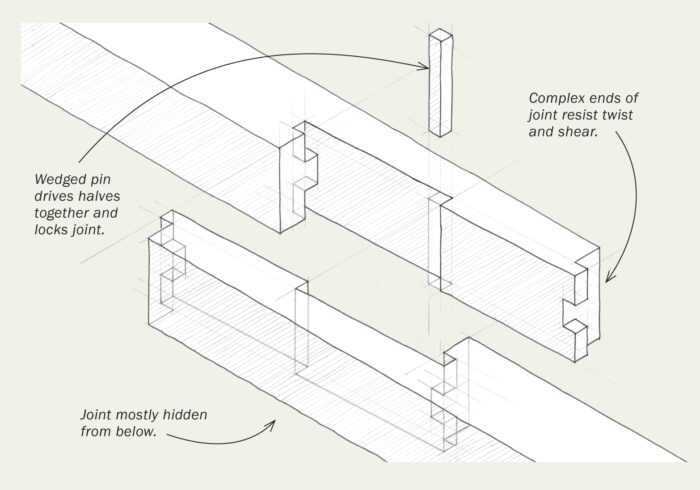
Blind, stubbed, dadoed, and rabbeted scarf joint
This scarf joint is not visible on the exposed surfaces of the wood, so it is an aesthetically ideal choice for places where you want a cleaner look. The two halves of the joint are identical. They’re assembled by putting the long flat faces together and then shifting the members until the stub tenons are in their mortises. These tenons make the joint resistant to shifting and sliding vertically. The joint is finally tightened by inserting a square pin, locking the stubbed tenons into the mortises. Instead of a pin, wedges can be used, which will tighten the joint further as they’re driven.
To see more of Shinmura’s architectural illustrations, construction projects, and other art, go to her website, emishinmura.com; or her Instagram, @emi.shinmura.












Log in or create an account to post a comment.
Sign up Log in