Build an adjustable tablesaw L-fence
Rabbets, tenons, flush-trimming, miters, and pattern work all get significantly easier when you build an adjustable L-fence like this one by Bob Van Dyke

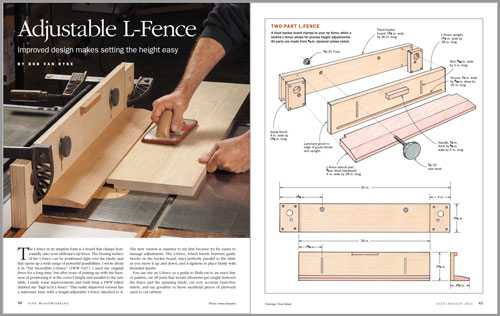
Synopsis: Rabbets, tenons, flush-trimming, miters, and pattern work all get significantly easier when you build an adjustable L-fence like this one by Bob Van Dyke. It consists of a fixed backer board that clamps to the rip fence, with a slotted L-fence that can be located above the blade and adjusted for a perfect cut. The location eliminates the risk of kickback and small parts being trapped between the blade and fence. With the addition of this fence, your tablesaw just got a lot more versatile.
The L-fence in its simplest form is a board that clamps horizontally onto your tablesaw’s rip fence. The bearing surface of the L-fence can be positioned right over the blade, and that opens up a wide range of powerful possibilities. I wrote about it in “The Incredible L-Fence” (FWW #237). I used my original fence for a long time, but after years of putting up with the fussiness of positioning it at the correct height and parallel to the saw table, I made some improvements and built what a FWW editor dubbed my “high tech L-fence.” This vastly improved version has a stationary base with a height-adjustable L-fence attached to it. The new version is superior to my first because it’s far easier to manage adjustments. The L-fence, which travels between guide blocks on the backer board, stays perfectly parallel to the table as you move it up and down, and it tightens in place firmly with threaded knobs.
How to Use the L-Fence
This simple-to-make tablesaw fence
accessory handles a wide variety of joinery cuts.
You can use an L-fence as a guide to flush-cut to an exact line or pattern, cut off parts that would otherwise get caught between the fence and the spinning blade, cut very accurate burn-free miters, and say goodbye to those sacrificial pieces of plywood used to cut rabbets.

One basic principle of working with an L-fence is that, unlike with a regular tablesaw cut, you plan things so your waste piece is between the blade and the rip fence. Sounds dangerous? It’s not, because the L-fence is raised off the saw table—usually higher than the blade—and its width provides a few inches of space so the waste cannot get caught between the blade and the rip fence.
Building my new L-fence is straightforward. I use Baltic-birch plywood for most of the parts because it is structurally stable, holds fasteners well, and is readily available. Solid wood or cabinet-grade plywood can also be used. The plastic knobs and T-nuts are available from any woodworking-supply store or from McMaster-Carr (mcmaster.com). I make the lateral part of the L from hardwood. The few hours it takes to make this jig will be paid back tenfold in the number of times you will use it going forward.
 From Fine Woodworking #290
To view the entire article, please click the View PDF button below.


Comments
What brand of removable double-face tape do you use for attaching guides or templates to a work piece?
Bob uses Spec Tape
How is the L-Fence attached to the Shop Made fence?
Same as the rabbeting fence, screwed in.
Where did Bob get the 1/4-20 knobs he uses to lock the L-fence in position?
Log in or create an account to post a comment.
Sign up Log in