Ep 4: Hand-cut pins with a twist
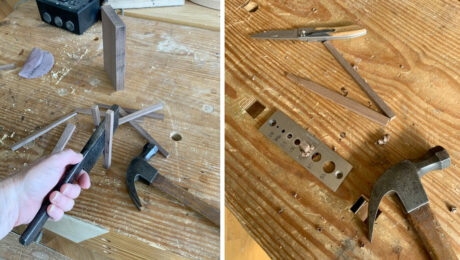
Behold the power of blue tape! Mike's dovetailing master class continues as he demonstrates his now famous method for cutting consistent and precise pins by hand.
Videos in the Series
-
Ep 1: Hanging Wall Cabinet with Mike Pekovich–Intro
December 17, 2019
-
Ep 2: Laying Out and Rabbeting the Case
December 17, 2019
-
Ep 3: Dovetailing on the tablesaw
December 24, 2019
-
Ep 4: Hand-cut pins with a twist
December 31, 2019
-
Ep 5: Fitting the dovetails
January 7, 2020
-
Ep 6: Through mortise and tenon–Blue tape layout
January 14, 2020
-
Ep 7: Drilling and chopping mortises
January 21, 2020
-
Ep 8: Cutting the tenons
January 28, 2020
-
Ep 9: Prefinishing and gluing up the case
February 4, 2020
-
Ep 10a: Making the door frame
February 11, 2020
-
Ep 10b: Creating the door panel and dry-fitting
February 11, 2020
-
Ep 11: Sizing the kumiko grid
February 18, 2020
-
Ep 12: Door glue-up
February 25, 2020
-
Ep 13a: Fitting the door
March 3, 2020
-
Ep 13b: Mounting the door hinges
March 3, 2020
-
Ep 14: Door details
March 10, 2020
-
Ep 15a: Half-blind dovetailed drawer – part 1
March 17, 2020
-
Ep 15b: Half-blind dovetailed drawer – part 2
March 17, 2020
-
Ep 15c: Drawer grooves and glue-up
March 17, 2020
-
Ep 16: Shiplapped back boards
March 24, 2020
-
Ep 17: Fitting the drawer
March 31, 2020
-
Ep 18a: Kumiko–Asa No Ha pattern part 1
April 7, 2020
-
Ep 18b: Kumiko–Asa No Ha pattern part 2
April 7, 2020
-
Ep 18c: Trimming a kumiko panel to size
April 7, 2020
-
Ep 19: Simple shellac and wax finish
April 14, 2020
-
Ep 20a: Installing the shelf supports and hardware
April 21, 2020
-
Ep 20b: Installing a bullet catch–Conclusion
April 21, 2020








Comments
Mike,
You are one of the few that points out the hardest part of cutting dovetails has nothing to do with sawing. It is aligning the boards to knife around the tails. It seems and sounds so simple but it is challenging to remain square and get the boards aligned so the pin is not too big or small.
I'm curious if you have experimented with cutting a rabbet in the tails to register the tail board to the pin board, either with a skew block plane or machine?
Shaun
Okay. I have watched the first four fantastic videos. Mike is a great instructor and doesn't leave the viewer with many questions.
The one question I have is - when is the next video?
Norm
We release one episode (or group of episodes) every Tuesday.
Hi Shaun, Yes, this technique is based on cutting a rabbet in the tails board to help with alignment. The rabbet works well but can present its own problems. Namely, it throws off the shoulder to shoulder dimension by thinning the stock at the joint. In some cases that’s not a problem, but in this particular project it is because it would require a different shoulder to shoulder length for the shelf and that throws of the efficiency of starting with like-sized parts. The shoulder guide performs the same task without altering the dimensions of the parts which is why I like it. Also, and I don’t think I mention it in the video, by shifting the guide forward or back from the scribe line, you can alter the fit of the joint. On soft woods like pine drawer sides, I can intentionally create a too-tight fit by positioning the guide slightly below the scribe line to accommodate compression. Cool stuff.
In your defense Mike, you mention that when dovetailing the drawers later in the series.
I’ve used that bandsaw technique for a long time but silly me, I just cut several fingers to make chiseling easier, without thinking I could actually cut more of the waste at the same time. D’oh!
I’m still not sold on grabbing my router to finish things off but I’ll wait for Mike’s next video, maybe I’ll change my mind. I like my chisels and routers are loud and messy, but I also like perfect dovetails. I’m pretty sure Mike has made a lot more of them than I have. Thanks Mike, good book by the way :)
Thank you!
Agree on the shoulder to shoulder length which for the cabinet would be an issue for your middle shelf.
Thanks. Great video series!
There is such beauty in simplicity. As simple as Mike Pekovich's blue tape technique is, it gives beautiful results. I am making a china cabinet using the half-blind mitred dovetails featured on Chris Gochnaur's "contemporary sideboard." I had completed two of the four corners of the case before watching Mike's video featuring blue tape. His advice enabled me to solve the single biggest problem I was having with this complicated joint - namely, seeing the pin's lay lines. It made an enormous difference to my confidence while sawing and resulted in a much more precise fit, with significantly less paring prior to the joint coming together. Sending a big thank you to MP, CG, and the FW staff for making it possible for wannabes like me to learn how to build fine furniture.
Hello, thanks for the great video! I am curious if there are any plans for this project available? I am curious about the width (depth?) - Meaning how far off the wall it will sit?
The plans are available on this page: https://www.finewoodworking.com/videoworkshop/2019/12/hanging-wall-cabinet-with-mike-pekovich
Nice camera work. Closeups that show what is really going on.
Is there a reason that you do not gang up the side boards to cut them? When hand cutting, we do that all of the time.
Complementary to the blue tape "trick": make sure the ends of your boards are smooth before doing any kind of precision marking. A no-brainer in hindsight, but I spent years trying to get accurate pencil lines on rough ends. Now a pass with 220 sandpaper on a rigid hardwood scrap sanding block makes the layout easy and accurate.
Lot of great teachers on FWW staff and contributors, and Mike is one of my favorites. Hope he keeps his teaching hat on as he moves up to editor.
I have two thinnish pieces of pine, dovetailed into a 90° reinforced with a corner piece of ply which when the down piece is in the vice the ply hits and registers with the side of the bench. To align the pieces I line up whichever edge makes sense with one edge of 90° and clamp the piece to it. If the edge is in line in one piece it's in line with the other.
They are long enough to get things square by lining up the edges as well. As for seeing knife lines or knowing which is the waste. I use a thin propelling pencil to darken the line (2B lead) then hatch the non waste. I have no trouble knowing which side of the line to cut on or pare to.
Set up takes very little time. I can lay my hands on the jig very easily.
BTW blue tape looks to be what we on the other side of the pond call masking tape. Available in different levels of stickiness, you use the low tack stuff for newly painted walls for eg.
I pencil in my knife lines pretty routinely. My pencil sits in a hole in the shelf just above the bench, behind the marking knives (scary sharp).
to align the tails and pin, I use a pair of right angle clamps. It doesn't move and you can pick up the whole thing to look for any problems. Sure makes it easy!
Log in or create an account to post a comment.
Sign up Log in