Skip to content
Fine Woodworking
Main Menu
Subscribe
GET THE MAGAZINE & MORE
Magazine Cover
  • Save 69% off the cover price
  • Or, get everything with UNLIMITED, including 40+ years of the online archive.
Subscribe Now!
Subscribe
  • Projects & Plans
  • How-To
  • Shop Tips
  • Tools & Materials
  • Videos
  • Magazine
  • Video Workshops
  • Members
  • Forum
  • Gallery
  • Blogs
  • More
    • Log In
    • Join
    Fine Woodworking Main Menu Subscribe

    Fine Woodworking Project Guides

    Chairs, Benches, and Stools

    Guide Home
    Chapter
    • Design and Techniques
    • Side Chairs and Dining Chairs
    • Outdoor Seating
    • Benches, Settees, and Sofas
    • Stools
    Blog

    Hidden Steel Stabilizes this Custom Bench

    Nancy Hiller designs a two-seater bench for a space between kitchen and dining room.

    Author Headshot By Nancy R. Hiller Mar 16, 2020
    custom red bench

    A couple of clients whose kitchen cabinetry I designed and built 18 months ago asked me to come up with a bench for the peninsula between their kitchen and dining room. They’d looked online and found nothing quite right.

    The brief: The bench would have to seat two people, as their twin daughters often sit together doing homework; it must also work with the aesthetic of this in-between space, avoiding too-close identification with either room.

    Modern Kitchen
    Future home. The bench is designed for sitting at the peninsula, shown here.

    I suggested three possibilities:

    • a wooden bench in a style related to the kitchen cabinets
    •  an upholstered bench in a style related to their modernist dining chairs
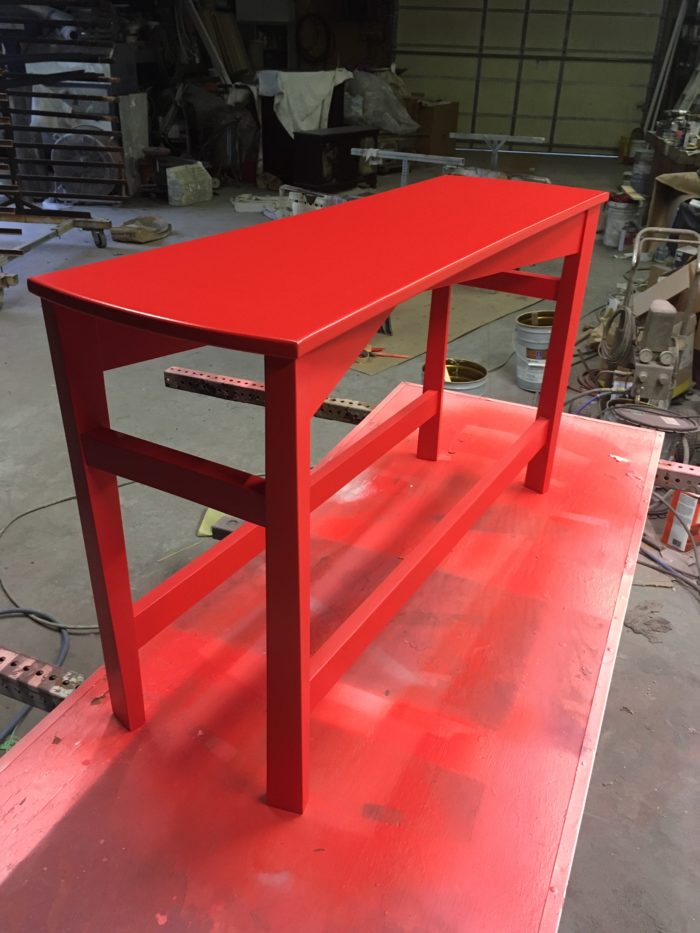
    •  a wooden bench that echoed a pair of minimalist, red-lacquered chairs they kept in the dining room corners for a little bit of zing.

    They chose the red chairs. Besides their striking color, the chairs had compound-tapered legs, plywood seats with subtle concave and convex curves for their outline, and nearly-invisible bracing that tied the legs together.

    making trial legs for bench
    Making a mock-up. For the first trial leg I scaled up the legs of the chairs, cut the tapers on the bandsaw, and cleaned them up by hand. Here you can see the outward splay of the chair legs; I thought this would pose a tripping hazard for the bench, which will sit in a high-traffic area.

    I scaled up the dimensions of the chair legs in keeping with the bench’s greater length and height. Instead of the outward flare of the chairs’ legs, I decided to cut the tapers so that the apparent flare went inward. That kept the legs from sticking out farther than the benchtop at floor level, something I was concerned would pose a tripping hazard. It also allowed me to make the joints for the stretchers at 90°.

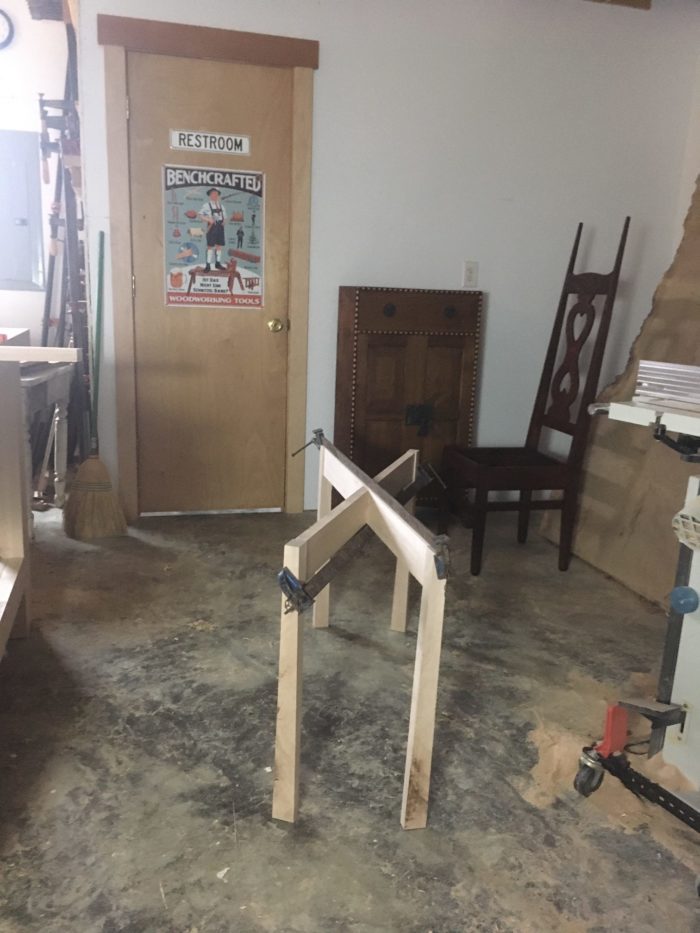
    To ensure the bench’s four legs would be identical (which was important for the joinery), I made a couple of jigs for use at the tablesaw.

    taper jigs
    One of my taper jigs
    clamp holding the leg secure for sawing
    A carefully placed shim in conjunction with a Destaco clamp holds the leg secure for sawing.

    Next we discussed dimensions. A piano bench topped with several hefty hardback books gave us an ideal height for those who are going to use the bench: 25 in. The length had to accommodate two people without appearing too long relative to the peninsula; we settled on 42 in. The clients liked the narrow look of the piano bench and wondered whether I could make the new piece narrower still—perhaps 11 in.? This brought me to the first challenge: A bench that tall and narrow, with such minimal structure below, would be potentially unstable. We compromised at 13-1/4 in.

    I recommended stretchers lower down on the legs to tie the ends together, augmented by short stretchers higher up at each end. Without these, I was concerned the criss-cross apron under the seat would leave the bench vulnerable to weakening over time. The clients suggested the low stretchers would function well as footrests and gave me the ideal height for the top edges.

    I built a rough full-scale mockup to give us all an accurate sense of the space the bench would occupy, as well as to let the clients try it out for sitting, just to make sure they were happy with the dimensions before I started work on the actual piece. A bit of fine-tuning, and we had the details nailed down.

    bench legs
    Tall and skinny.

    The apron is made of two pieces notched over each other and glued. The rest of the joints are Domino tenons.

    Once I had the basic structure together, I laid a piece of plywood on top and carefully sat down on the bench to see how it felt. The tall, skinny form still struck me as top-heavy; I wanted to lower the center of gravity. I often use steel angle to enhance rigidity over long expanses; steel would add the necessary weight to make this bench far more stable. I decided to embed two pieces of ½-in.-square steel rod invisibly in each long stretcher. To do so, I cut a groove on the tablesaw using a Forrest special-grind flat-bottom dado blade, making several passes to get the necessary width.

    wo lengths of 1/2-in.-square steel rod
    Heart of steel. Two lengths of 1/2-in.-square steel rod are stacked inside each stretcher’s groove. I cut the rod a few inches shorter than the stretchers so I could fill the ends with wooden blocks glued in place. This gave me the solid meat necessary to join the stretchers to the legs.

    To join the stretchers to the legs I would need a couple of inches of solid wood at each end of the groove, so I filled the grooves at each end with maple cut to fit. Then I capped the tops with a maple lid, which I trimmed to width and length after the glue was dry.

    setting the legs on blocks for the correct height
    To hold the stretchers at the correct height, I set them on blocks while I drilled the holes. The advantage of using screws with Domino tenons is that they pulled the parts together without the need for clamps on the compound-angled surfaces.
    spray painting the bench red
    Concave long edges reduce the width of the top. The ends are convex.

    The seat is made from 3/4-in. Baltic-birch plywood cut to shape on the bandsaw, then trimmed with a router and top-bearing bit. After cleaning up the bench, I had David Willibey of Bloomington Coatings spray it with Sherwin Williams paint matched to the original red of the chair.

    finished red bench

    Nancy Hiller is a professional cabinetmaker who has operated NR Hiller Design, Inc. since 1995. Her most recent books are English Arts & Crafts Furniture and Making Things Work, both available at Nancy’s website.

    What to Include in a Written Job Proposal

    Nancy Hiller knows the value of agreed-upon boundaries, managing expectations, and having a written record

    Consulting With Prospective Clients

    “How do you handle inquiries from prospective customers?” asks a reader. “Do you have any rules for design and project approvals?”

    5 Tips for Dealing with Difficult Clients

    As long as you have to sell your work to make a living, you’re working for someone else: your customer

    Sign up for eletters today and get the latest techniques and how-to from Fine Woodworking, plus special offers.

    Sign Up

    Get woodworking tips, expert advice and special offers in your inbox

    Sign Up
    ×
    X
    X
    Previous: Comfortable Seat for Two Next: A Short History of Sofas and Settees

    Guide

    Chairs, Benches, and Stools

    Chapter

    Benches, Settees, and Sofas

    Comments

    1. User avater
      Jurgen01 | Mar 16, 2020 05:52pm | #1

      Very nicely done. I'll bet the girls just love this bench, because it is so cool.

    2. nancyhiller | Mar 17, 2020 03:22pm | #2

      Let's hope!

    3. Kikodoss | Mar 18, 2020 01:36pm | #3

      Steel and wood, I guess that makes Nancy a "Mixed Media Maker" :-)

      Simple and elegant solution. That's what separates the pros from us weekend warriors.

      Thanks Nancy !

    4. User avater
      CrookedHands | Mar 19, 2020 01:22am | #4

      Looks like Joey and Tony approve.

    Log in or create an account to post a comment.

    Sign up Log in

    Chairs, Benches, and Stools

    Chairs, Benches, and Stools

    Projects, plans, and techniques for every type of chair you aspire to build.

    View Project Guide

    View All Project Guides »

    Become a member and get unlimited site access, including the Chairs, Benches, and Stools Project Guide.

    Start Free Trial

    Design and Techniques
    • Chair Design
    • Techniques
    • Seats: Upholstered and Woven
    Side Chairs and Dining Chairs
    • Side Chairs
    • Dining Chairs
    • Armchairs
    • Rocking Chairs
    Outdoor Seating
    • Garden Chairs
    • Adirondack Chairs
    • Outdoor Benches
    Benches, Settees, and Sofas
    • Benches
    • Settees and Sofas
    Stools

    Get the latest from Fine Woodworking Magazine

    • #292-NOV/DEC 2021

      • Kerf-bent wall cabinet
      • Online extras from FWW issue #292
      • How to tame curved parts with patterns
    • #291-Sep/Oct 2021

      • Build a modern coffee table
      • Online Extras from FWW Issue #291
      • Editor's Letter: Something old, something new
    • #290-July/Aug 2021

      • Build a Shaker chest of drawers
      • Online Extras from FWW Issue #290
      • From the editor: What we make matters
    • #289-May/June 2021

      • Arts & Crafts Coffee Table with Story-Book Charm
      • Links from Fine Woodworking issue #289
      • Step-by-Step Guide to Tuning Your Block Plane
    • #288-Mar/Apr 2021

      • Phil Lowe: A craftsman and gentleman
      • Online Extras from FWW Issue #288
      • Phil Lowe: craftsman, teacher, friend

    UNLIMITED membership - Get access to it all

    Start Free Trial Upgrade Membership

    Fine WoodWorking

    Follow

    Newsletter

    Get woodworking tips, expert advice and special offers in your inbox

    Sign Up

    Membership & Magazine

    • Members
    • Digital Libraries
    • Join Unlimited
    • Magazine Subscription
    • Magazine Renewal
    • Gift a Subscription
    • Customer Support
    • Manage Preferences

    Taunton Network

    • Fine Homebuilding
    • Green Building Advisor
    • Fine Gardening
    • Threads
    • About
    • Contact
    • Advertise
    • Privacy Policy
    • Careers
    • Copyright
    • Terms of Use
    • Accessibility
    • California Privacy Rights
    • Site Map

    © 2021 The Taunton Press, Inc. All rights reserved.

    Get step-by-step instructions, woodworking tips, expert advice and special offers in your inbox. Sign Up Now!

      Main Menu

    • Projects and Plans
    • How-To
    • Shop Tips
    • Tools & Materials
    • Videos
    • Gallery
    • Magazine
    • Video Workshops
    • Members
    • Forum

      Popular Topics

    • Design
    • Small Projects
    • Beds
    • Chairs, Benches And Stools
    • Built-ins
    • Storage And Shelves
    • Cabinets
    • Carving
    • Casework
    • Desks
    • Tables
    • Shop Storage And Furniture
    • Woodturning Projects
    • Workbenches
    • Surface Prep

      More

    • TV
    • Forum
    • Blogs
    • Webinars
    • Podcasts
    • Customer Support

      Account

    • Log In
    • Join

      Magazine

    • Current Issue
    • Past Issues
    • Digital Libraries
    • Magazine Index
    • Subscribe

      Membership

    • Member Home
    • Start Free Trial
    • Gift Unlimited
    • Log In

      Shop the Store

    • Books
    • DVDs
    • Taunton Workshops

      Events

    • Fine Woodworking Live
    • Fine Woodworking HANDS ON

      Account

    • Log In
    • Sign Up

    Newsletter

    Get woodworking tips, offers, and expert advice in your inbox

    Sign Up

    Follow

    UNLIMITED

    Become an UNLIMITED member and get it all: searchable online archive of every issue, how-to videos, Complete Illustrated Guide to Woodworking digital series, print magazine, e-newsletter, and more.

    Start Your Free Trial

    Upgrade Membership