How to Make a Two-Part Bending Form
Brian Boggs designs his two-part bending forms so that they mate exactly only after the laminates and cauls are in place; if they match with nothing between them, the fit will be imperfect once the laminates and cauls are loaded.

This is an excerpt from Brian’s article How to Create Curves with Bent Lamination in FWW issue #278.
The halves of a curved, two-part bending form are designed to mate exactly only after the laminates and cauls are in place; if they match with nothing between them, the fit will be imperfect once the laminates and cauls are loaded. Boggs starts by gluing up a large rectangular blank made with two sheets of 3/4-in. MDF that sandwich solid-wood ribs. Next he makes a two-part template by drawing the centerline of the curved part he wants on a piece of MDF and sawing down the line. Then, to draw the lines along which he’ll cut the form apart, he uses both halves of the template, one after the other—along with a washer that creates an offset. You can see an alternative two-part form for smaller bends in Add a Bead to a Curved Apron (coming 9/27).
Washer wizardry

Boggs first traces one half of the template, using a shopmade washer to create an offset equal to half the thickness of the bending package: the stack of laminates plus the flexible cauls. Then he pushes the second half of the template right up against the first and removes the first one. Again using the washer, he traces the second template. Then he saws carefully along the two curved lines.
Cauls perfect the curves
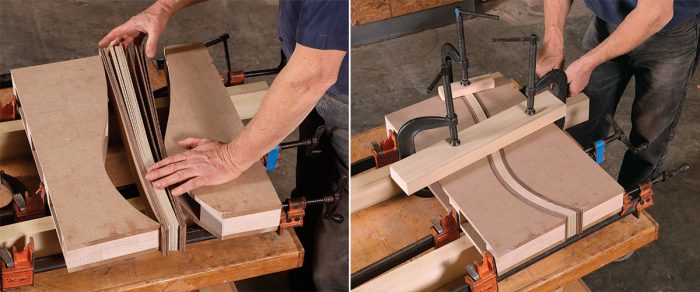
With the laminates in place but unglued, Boggs epoxies bendable cauls to each other and to both halves of the form. The epoxy allows the cauls to bridge minor irregularities in the forms. Once the cauls have been glued to the form and cured, you can apply glue to the laminates and begin producing parts.










Log in or create an account to post a comment.
Sign up Log in