
Make an Oval Bandsawn Box
Use this simple project as a jumping off point for more advanced and fun designs.

Bandsawn boxes are not like other boxes. They require an almost totally different set of tools and have no need for any type of joinery except glue. Making them is so much fun it can become all-consuming. Once you discover for yourself that they’re really easy to make, it can be hard to stop. They look beautiful, can be made in nearly any shape, and make fantastic gifts. What more to ask?
This project is a simple, medium-size oval box, and a good place to start. With practice you can try more adventurous forms, both larger and smaller, as the technique lends itself to creativity. A visit to a craft show will let you see some of the possibilities with the form. I’ve kept this box deliberately simple, but feel free to add a top knob or line the bottom, if you like.
Aside from the typical assortment of clamps, saws, and other shop tools, you’ll need (of course) a bandsaw, a drill press with sanding drums, and a French curve to lay out the oval. Flexible sanding pads are also really helpful to sand the curves, but you can get along without them.

Mill an Oversize Block
1. Start with a block of wood bigger than you need. If you’re going to take the box from the end of a plank, don’t cut your block to rough dimensions just yet.
2. If your wood is rough milled, then joint one face flat on a jointer.
3. Plane the opposite face to a final thickness of 1-7/8 in. or more.
Laying Out an Oval
You can’t lay out an oval with a compass (unless you’re really sloppy). For a true ellipse, or a mathematically symmetrical oval, you’re on your own. But here’s a simple technique to create a very nice oval with a French curve meant for drafting.
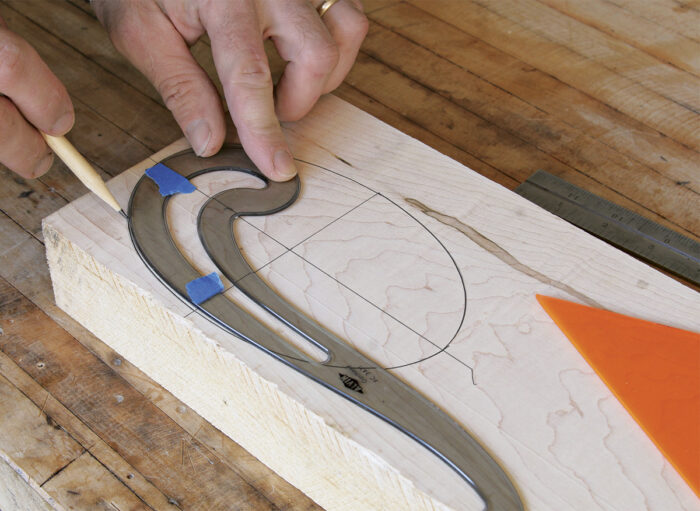
1. Draw a cross at least the length and width of the box you want. I use a drafting triangle because a combination square won’t lay flat on the board.
2. Align the French curve edge between the two endpoints of one quadrant of the cross. Slide it around to find the line that looks right. You should avoid laying out a shape with sharp transitions. When you get the right look, draw it on that quarter. Mark the start and end of the line on the French curve with pieces of tape. Lay out this same curve on the other three quadrants of the cross using the tape as guides. Now you have an oval outline. A
3. Crosscut and rip the oval from the larger board if necessary. The idea is to make your block a rectangle just bigger than the oval shape of the box. B
4. Scribe lines on one edge that show where to cut the bottom piece, middle section, and two lid pieces. I use a combination square and pencil, but a marking gauge will also work fine. The thicknesses (and layout line locations) are as follows: 3/16 in. bottom, 1-1/8 in. middle section, 1/8 in. inner lid, and 1/2 in. lid. C
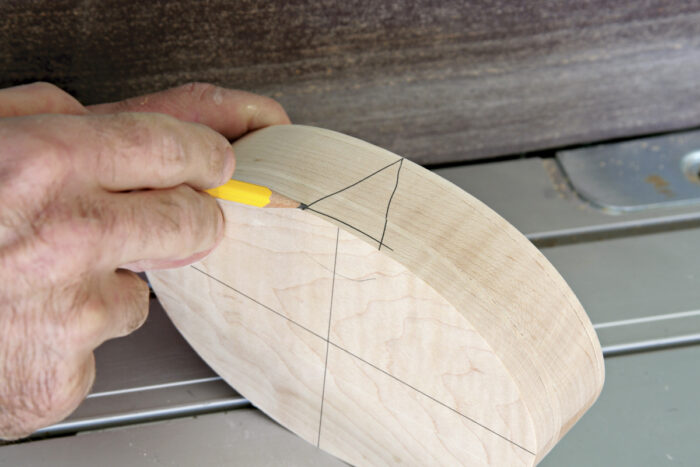
5. Most important, draw a triangle for orientation on one side of the block. This is crucial to avoid confusing the relationship of the pieces. The triangle shape is best because it’s nearly impossible to confuse one end for the other. D
| A
|
B
|
| C
|
D
|


Sawing the Box into Layers
Resawing curved shapes on a bandsaw can be very dangerous. The workpiece can be caught and spun by the blade. So resaw your box into layers before you cut the oval profile.
1. Fit a wide (5/8-in. or 3/4-in.) blade in your bandsaw. It’s possible to resaw the block with a smaller blade, but not as easy. You’ll have to go much more slowly and watch that the blade doesn’t wander from the line of cut. And the more it wanders, the more sanding you’ll have to do.
2. Set up the bandsaw’s fence 3/16 in. from the blade. You don’t need a special resawing fence to cut such a small block, though it might help.
3. Saw each piece from the block. I tend to saw down the middle of the layout lines rather than to one side or the other. Just make sure you’re consistent so you don’t make any one piece thinner at the expense of another. Use a push block when sawing the block into pieces. Without one, your fingers can get too close to the blade. A
4. After each cut, make a light pass on the jointer to smooth the face of the block. This will make sure you have one smooth face on each layer. You can’t easily joint the faces of the thin layers after you’ve cut them from the block. B
5. When you’ve sawn all four pieces, smooth the rough face of each to 100 or 120 grit. Ideally, use a thickness sander that can handle small pieces. If you have neither, then you’re stuck sanding by hand, like me. This can be tricky work. Random-orbit sanders tend to be more aggressive at the edges of small workpieces, which leads to domed surfaces. A hard sanding pad and some care will keep the pieces flat enough.
| A
|
B
|
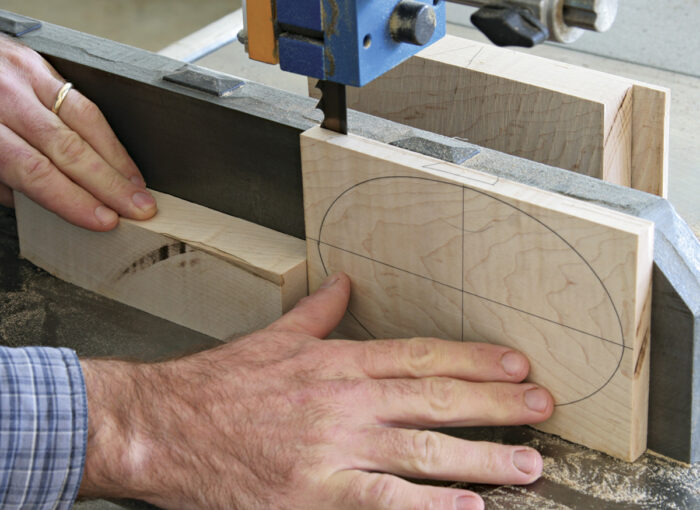
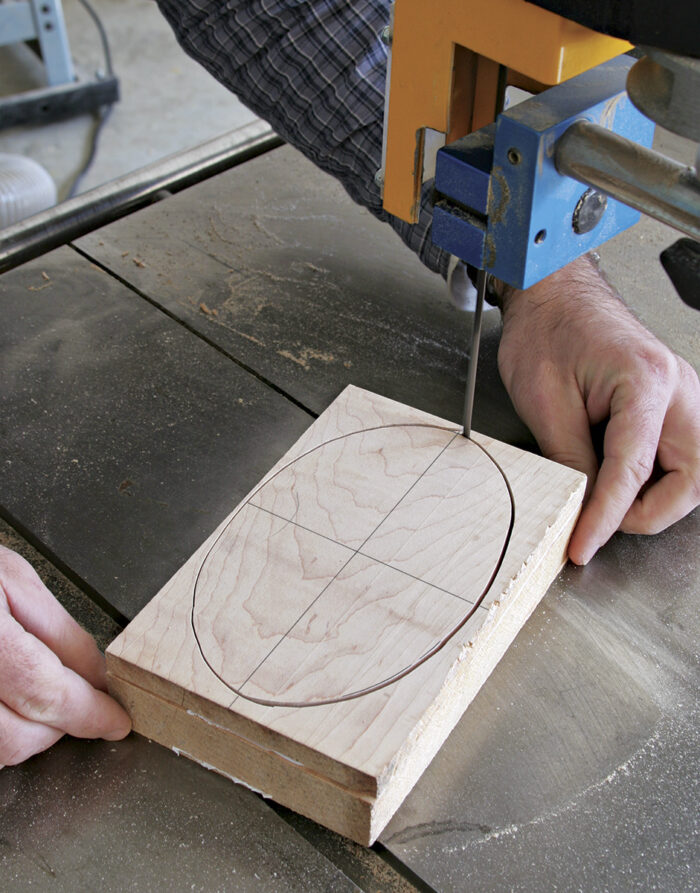
Sawing the Oval
1. Fit a narrow (1/4-in. or 3/8-in.) blade in your bandsaw to cut the oval curves; a wider blade can’t cut a tight enough radius.
2. Stack and secure the four pieces together with double-sided tape between each piece so they don’t move against one another while you saw and sand them. Test the tape joint before you start to saw.
3. Saw the outline of the oval on the bandsaw. It’s best to make one continuous cut rather than several because the edge will be smoother and easier to sand. A
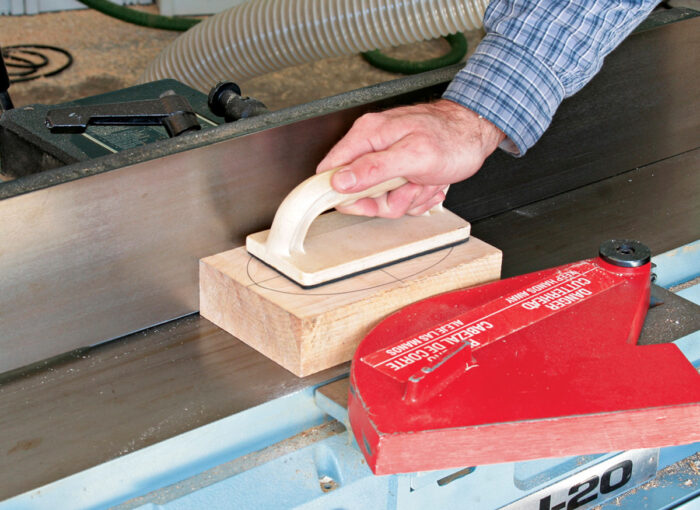
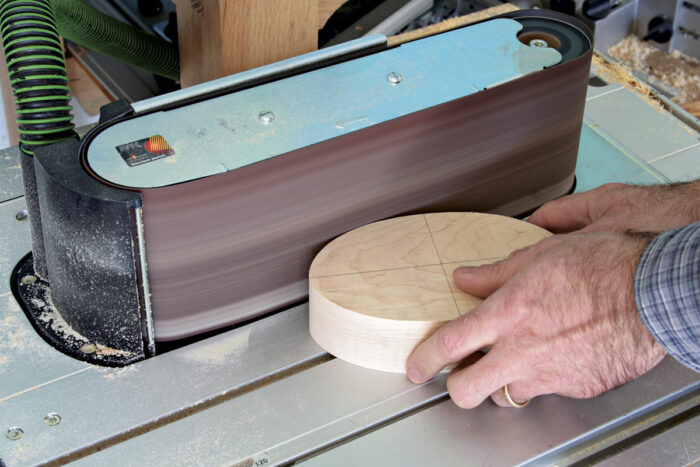
4. With the four pieces still taped together, sand the outside edges of the box. The best tool for this is a stationary belt sander because it holds the box exactly 90 degrees to the sanding belt. If you don’t have one, sand however you like, but make sure that you sand the sides perpendicular to the faces. The oval outline can start to look a bit lumpy if you don’t. B
5. Because you cut away the orienting triangle mark, make another one on the side of your sanded oval. C
| A
|
| B
|
| C
|
Sawing the Interior
This cut looks difficult because you’re cutting on an inside line. Just go slowly and you’ll find it rather simple.
1. Remove the double-sided tape and separate the pieces. Draw a line along the edge of the middle layer, 3/8 in. to 5/16 in. from the outside edge. There are fancy marking gauges designed for curved edges (they have two pins for a fence instead of a flat block). Use one if you have one. As I don’t, I find using my finger as a gauge works just fine. Just set the pencil firmly in your hand (hey, the hand is the most versatile tool around) so the tip is the right distance from the edge, and allow your finger to guide the pencil around the wood. A
2. Saw out the center of the oval on the bandsaw. It’s important to start the cut at one of the ends and not in the sides. The reason is that you’ll glue the gap back together, and a cut at the end gives you a face-grain to face-grain joint. B
3. Remove the waste from the middle and glue the kerf where you started the cut back together. Technically your oval is now thinner at one end, but the difference is miniscule because the closed gap is so small. Clamp with gentle pressure, as you can easily bow the sides and distort the glue joint surfaces. C
4. When the glue is dry, sand the interior of the middle layer. The best tool for the job is a drill press with sanding drum attachment because it can sand curves evenly at 90 degrees to a surface. Your other options are limited. A detail sander with a curved head might work if it fits inside the box. Sanding by hand is very difficult because the curves are tight. Flocking or using adhesive-backed lining are both ways to avoid sanding the interior. But leaving it unsanded will look distinctly sloppy. D
5. The inner lid needs to fit into the middle layer. Mark your line of cut by tracing the middle layer’s interior edge on the inner lid. Saw along the line using the bandsaw. As the wood is thin, use extra caution to avoid cracking or breaking the piece. E
6. Now sand the inside faces of the bottom and top pieces. You should do it now because after you glue them up, the surfaces aren’t as easily accessible and are very hard to sand.
A

B

C

D

E

Assembling the Box
There’s really no joinery in this bandsaw box to speak of except glued joints.
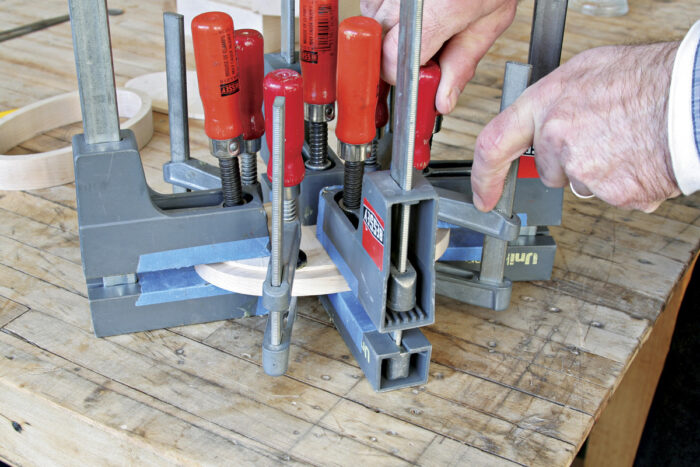
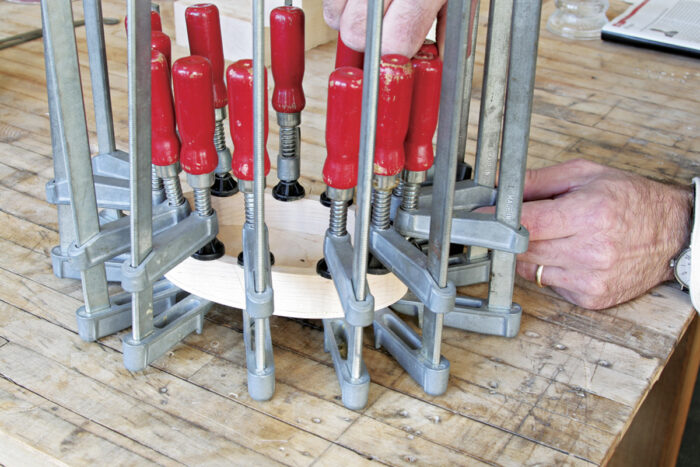
1. Glue the inner lid to the bottom of the lid. As the bottom is thin and flexible, you want to get clamping pressure at all points. A half dozen or more small clamps works best, I think, as cauls can hide spots where the two don’t touch. To align the inner lid properly, use the middle section in place as a guide (before you apply clamps). As you clamp the box parts together, watch that they don’t slide out of position. Yellow glue is slippery, so parts can shift until clamped firmly together. A
2. Glue the box bottom to the middle section using the same style of clamping. Be sure to check the orienting triangle on the side to get alignment right. Let the glue set. For best results, clean off beads of glue that squeeze out after the glue becomes rubbery but before it hardens. B
| A
|
B
|
Finishing the Box
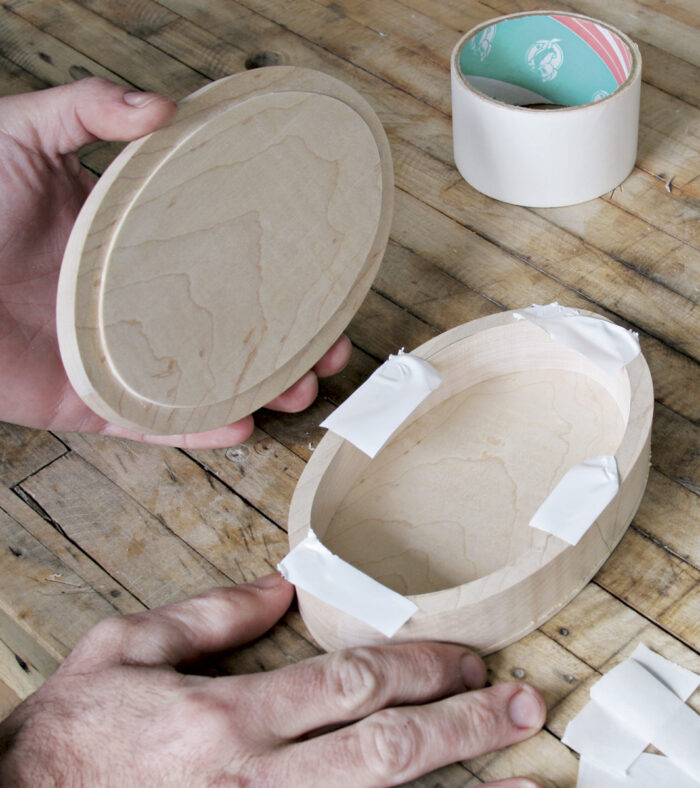
1. It’s best to shape and sand the exterior of the box as a single unit. So tape the lid and bottom together with bits of double-sided tape. A
2. Sand the outside edges of the box on a stationary belt sander. Finish up with a hand sander, orbital, or random orbital. You should sand before routing to get a smoother routed edge.
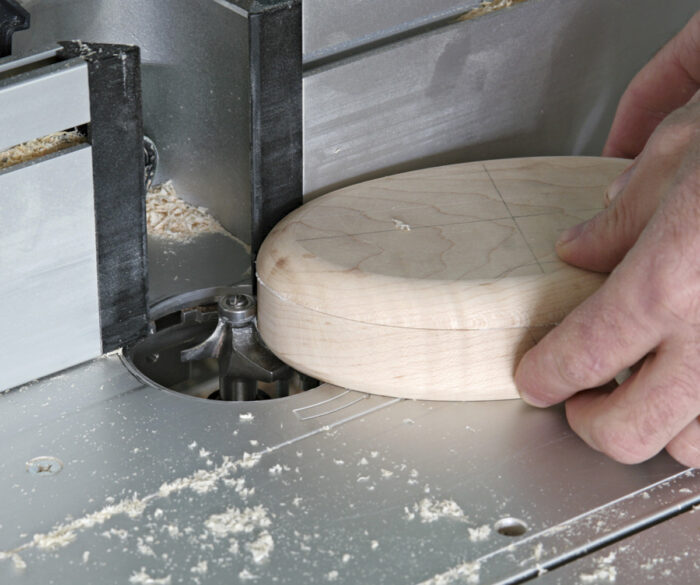
3. Round over the edges of box, top and bottom, on a router table fitted with a bearing-guided roundover bit. Don’t try this with a handheld router. The box is small and nearly impossible to clamp, making disaster likely. Even on the router table, hold the box very securely and push it through the cut, against the spinning direction of the bit. B If you don’t have a router table, you can either leave the edges straight (looks like a Shaker oval box) or file down the edges with a rasp. Using a rasp just takes more time and an eye for accuracy.
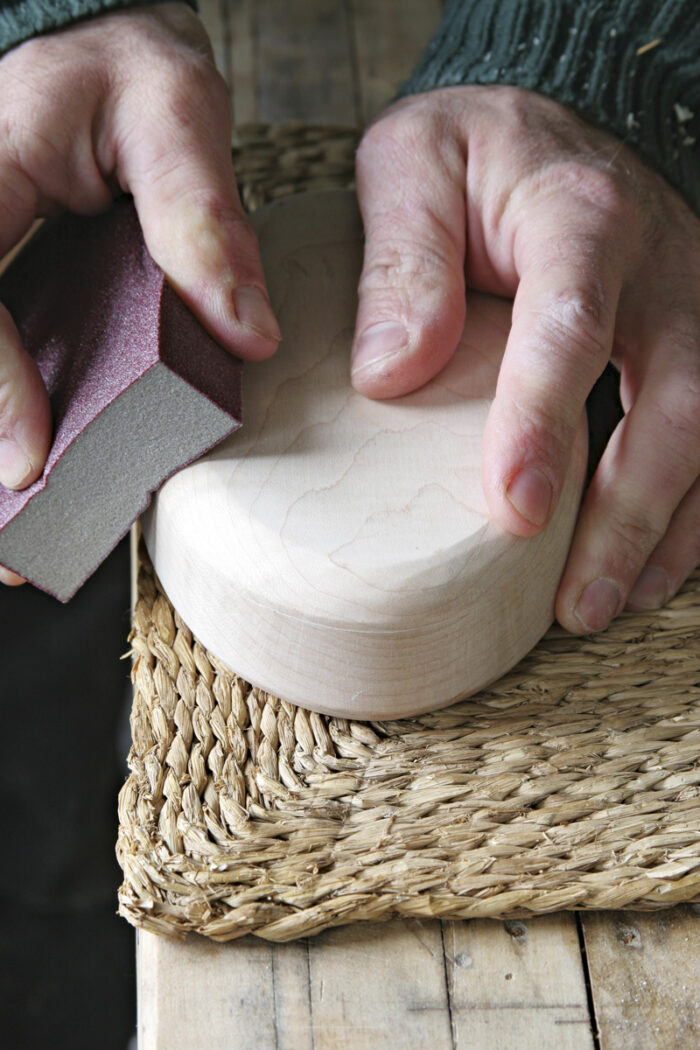
4. Finish sanding the box’s exterior. This job is awkward business and best done by hand. The box is small and only the top and bottom are flat. Simply using a quarter-sheet of sandpaper does the job. However, I’ve had the best success with flexible sanding blocks. They conform to the curved edges well and last longer than sandpaper. Sand up to 220 grit or more for maple. C
5. For finishing, either an oil or wipe-on varnish works well.
A
 B |
 C |
|
|
 Excerpted from Strother Purdy’s book, Traditional Box Projects.
Browse the Taunton Store for more books and plans for making boxes.


Log in or create an account to post a comment.
Sign up Log in