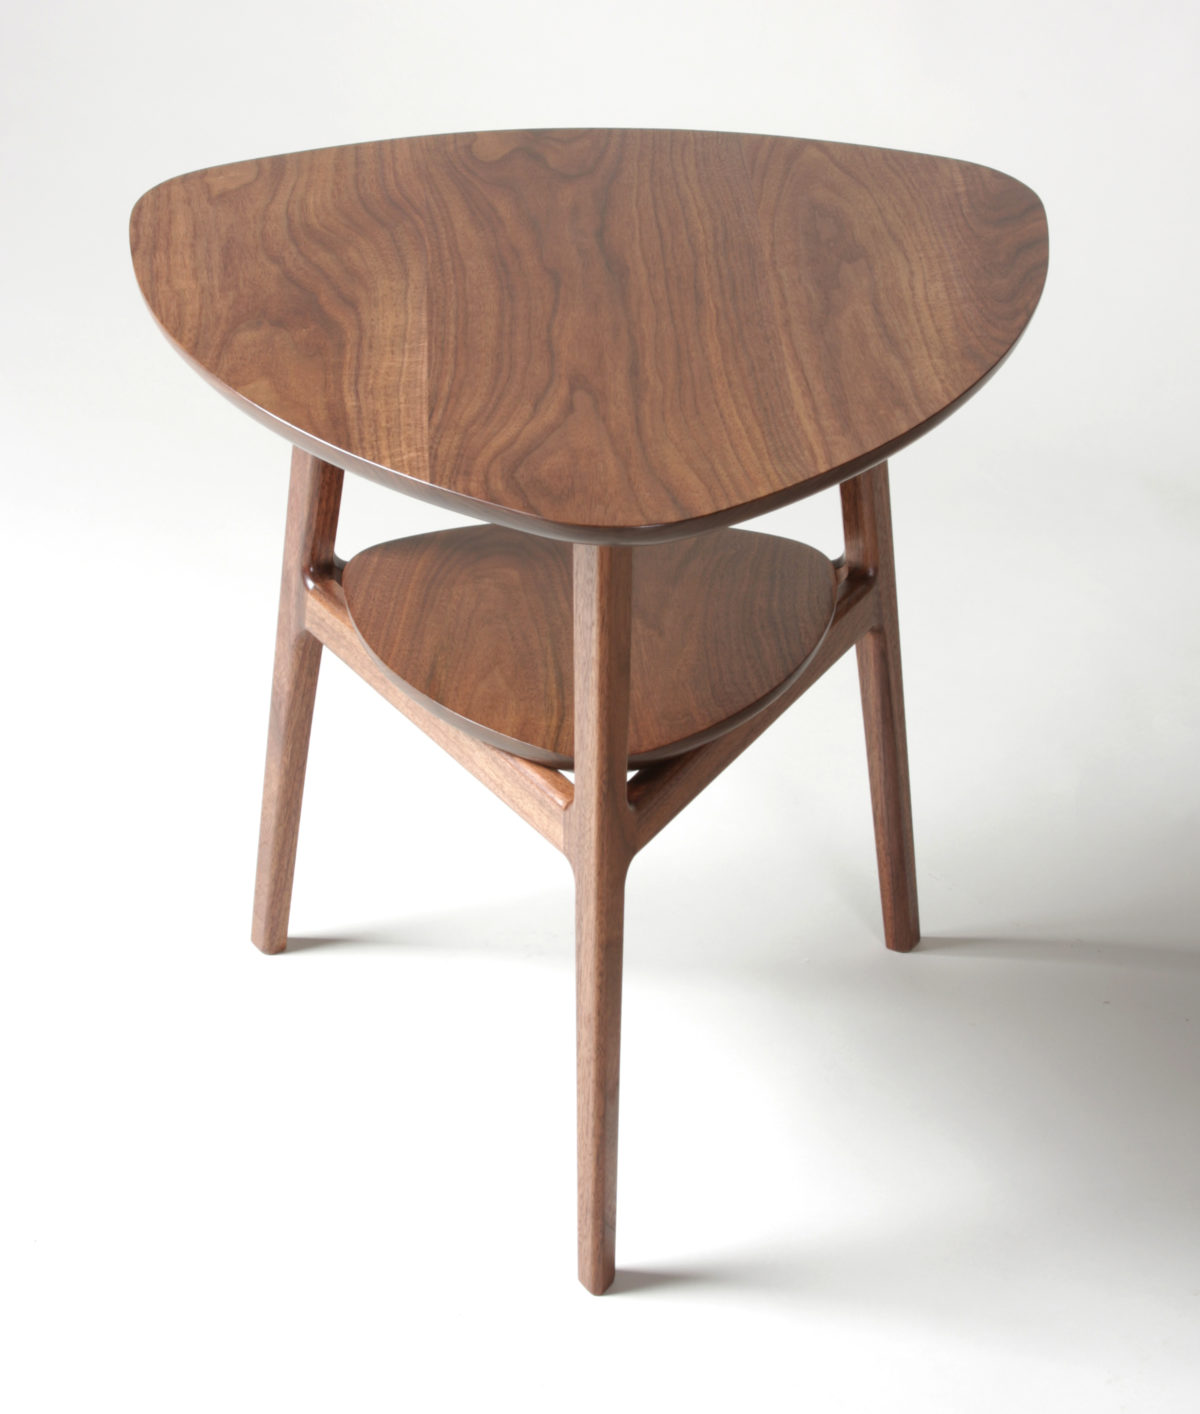
A friend of mine is currently outfitting his mid-century home with period-appropriate furniture. He found a side table design he liked, but it was an older piece that was no longer in production. It had a walnut top and shelf, with anodized aluminum legs in a nice bronze color. Drawing on details from that version and other vintage side tables, I came up with this design that was a lot of fun to build.
This project is a great excercise in geometry. The top and shelf are based on an equilateral triangle with circles drawn at each of the three points. An ellipse then connects each of the circles, rounding the sides as they connect to the edge of each circle.
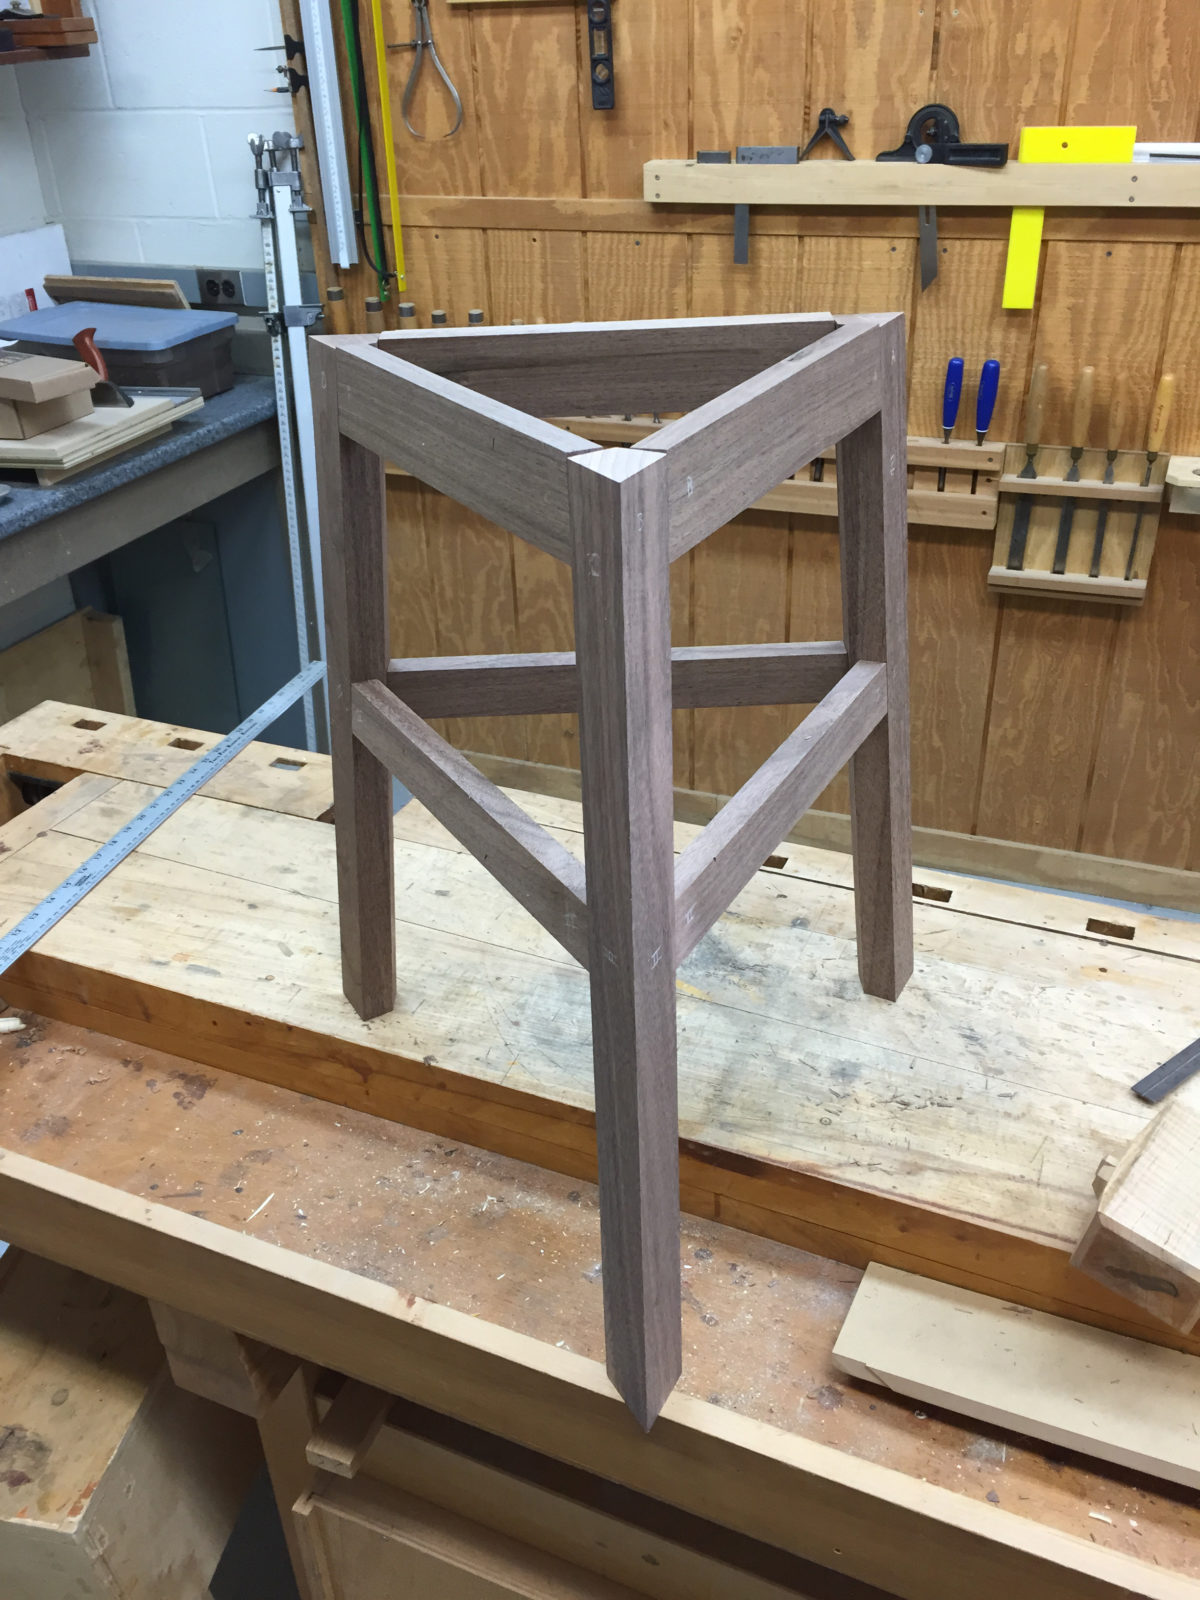
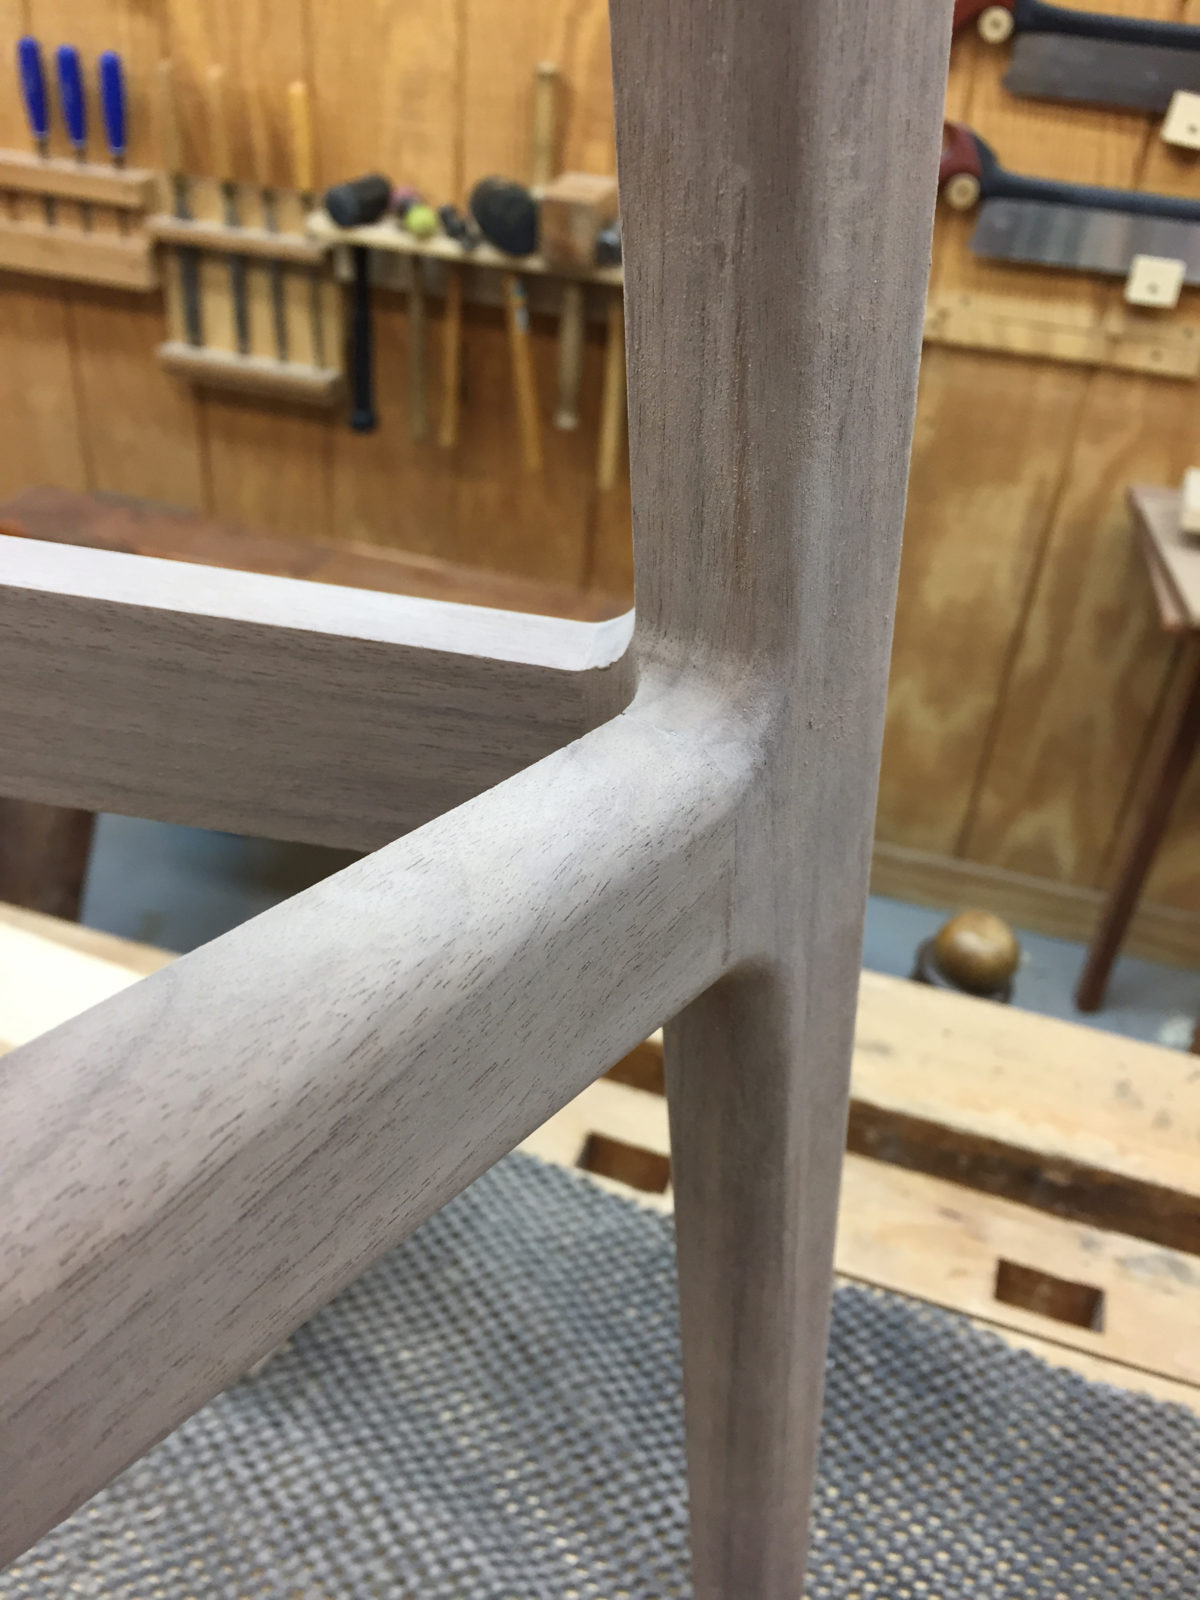
The base is also a triangle with each leg leaning in seven degrees towards the center, and then each leg is tapered from top to bottom. The legs start out as a triangular shape and then are rounded and sculpted after glue-up.
Sign up for eletters today and get the latest techniques and how-to from Fine Woodworking, plus special offers.
2) These three boards being glued-up for the top were cut from one length of board, for a nice grain and color match.
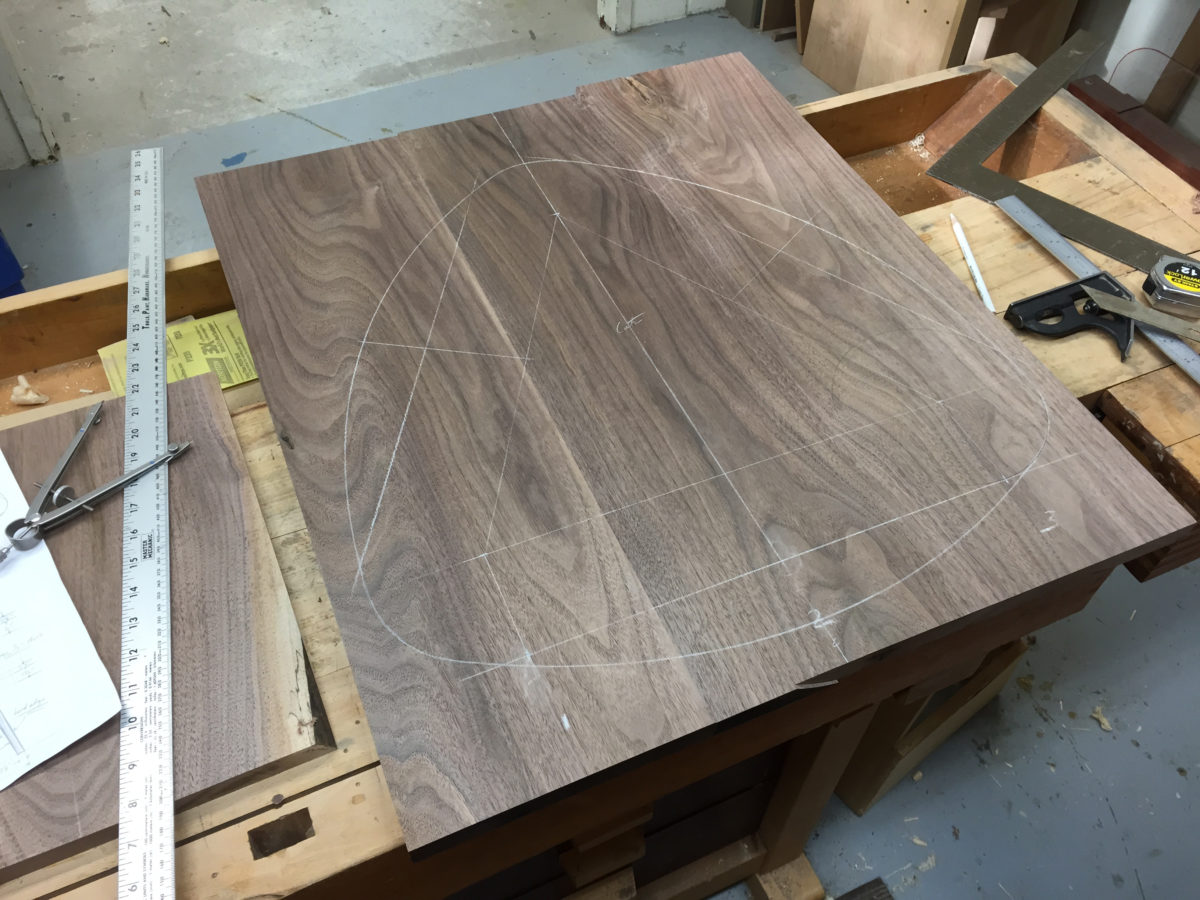
3) To layout the shape for the top, I first started with an equilateral triangle, drawing 7 inch diameter circles at each point. Then using a symetric drawing bow, I made an ellipse connecting the outer edges of each circle.
The shelf was layed out using the same technique as the top. Being scaled down to 4 inch diameter circles at each point of the triangle.
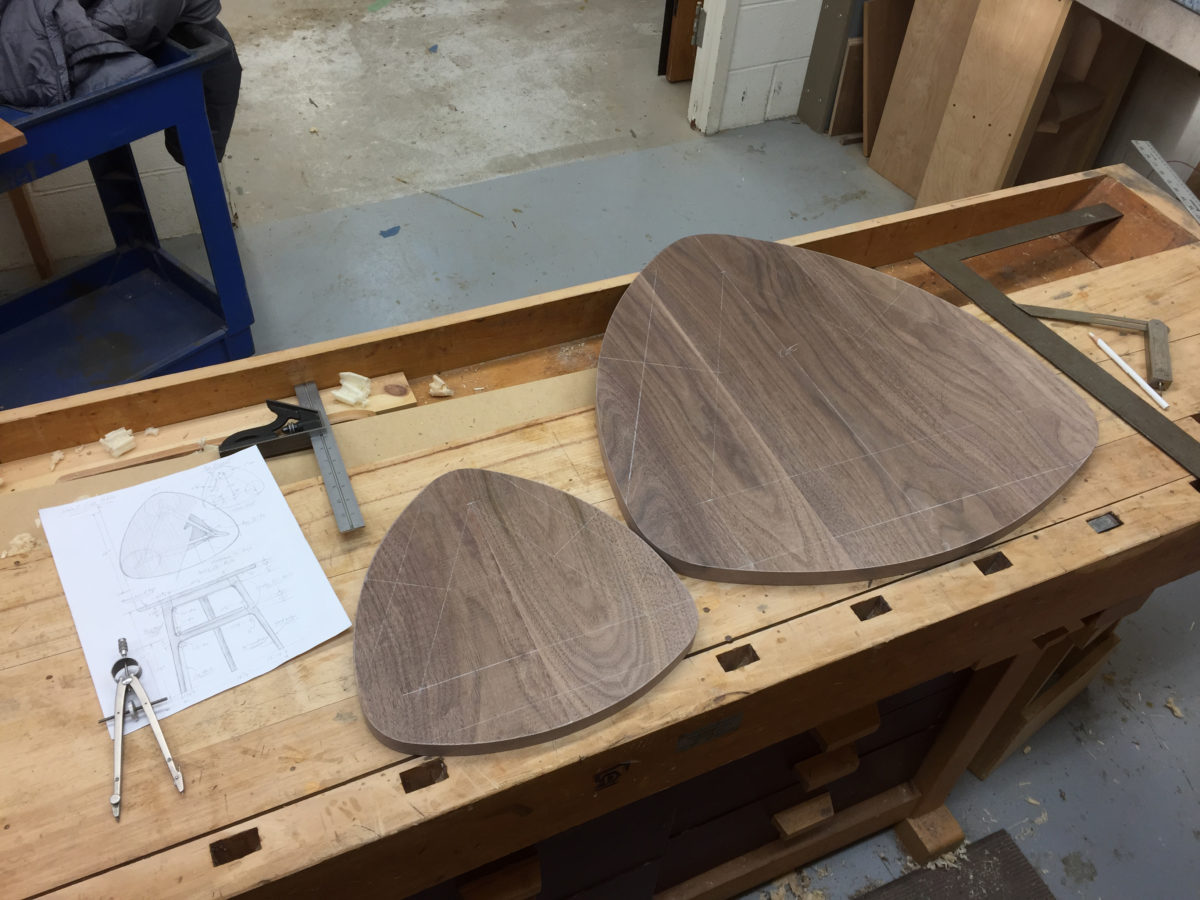
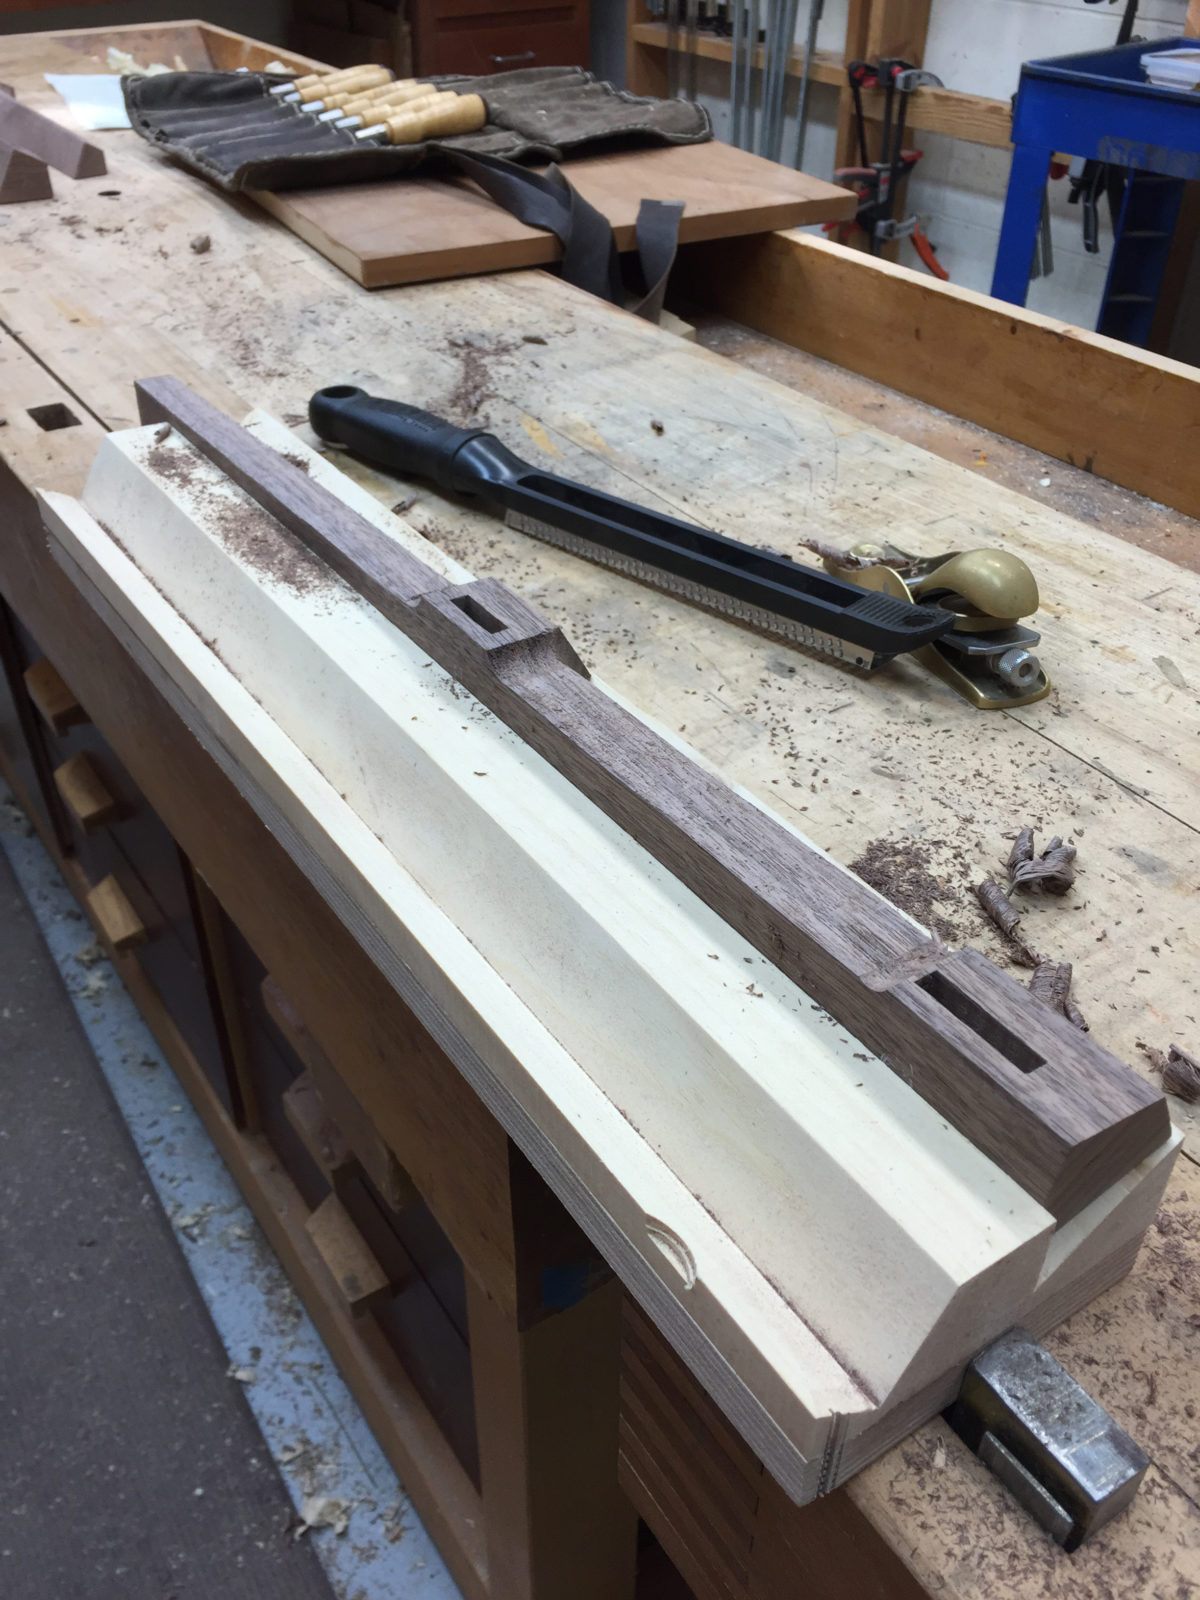
4) The final shape was cut at the bandsaw. A white pencil was used for the layout to make the line more visible on the darker walnut. Next, on to the base!
6) With the base dry-fit, I drew differnet sized circles to transition from the apron and stretchers to the taper of the legs.
7) Holding the leg in a jig, forstner bits were used to drill holes adjacent to the drawn lines.
8) After cutting away most of the waste for the tapers at the bandsaw, various files and an apron plane were used to smooth things out.
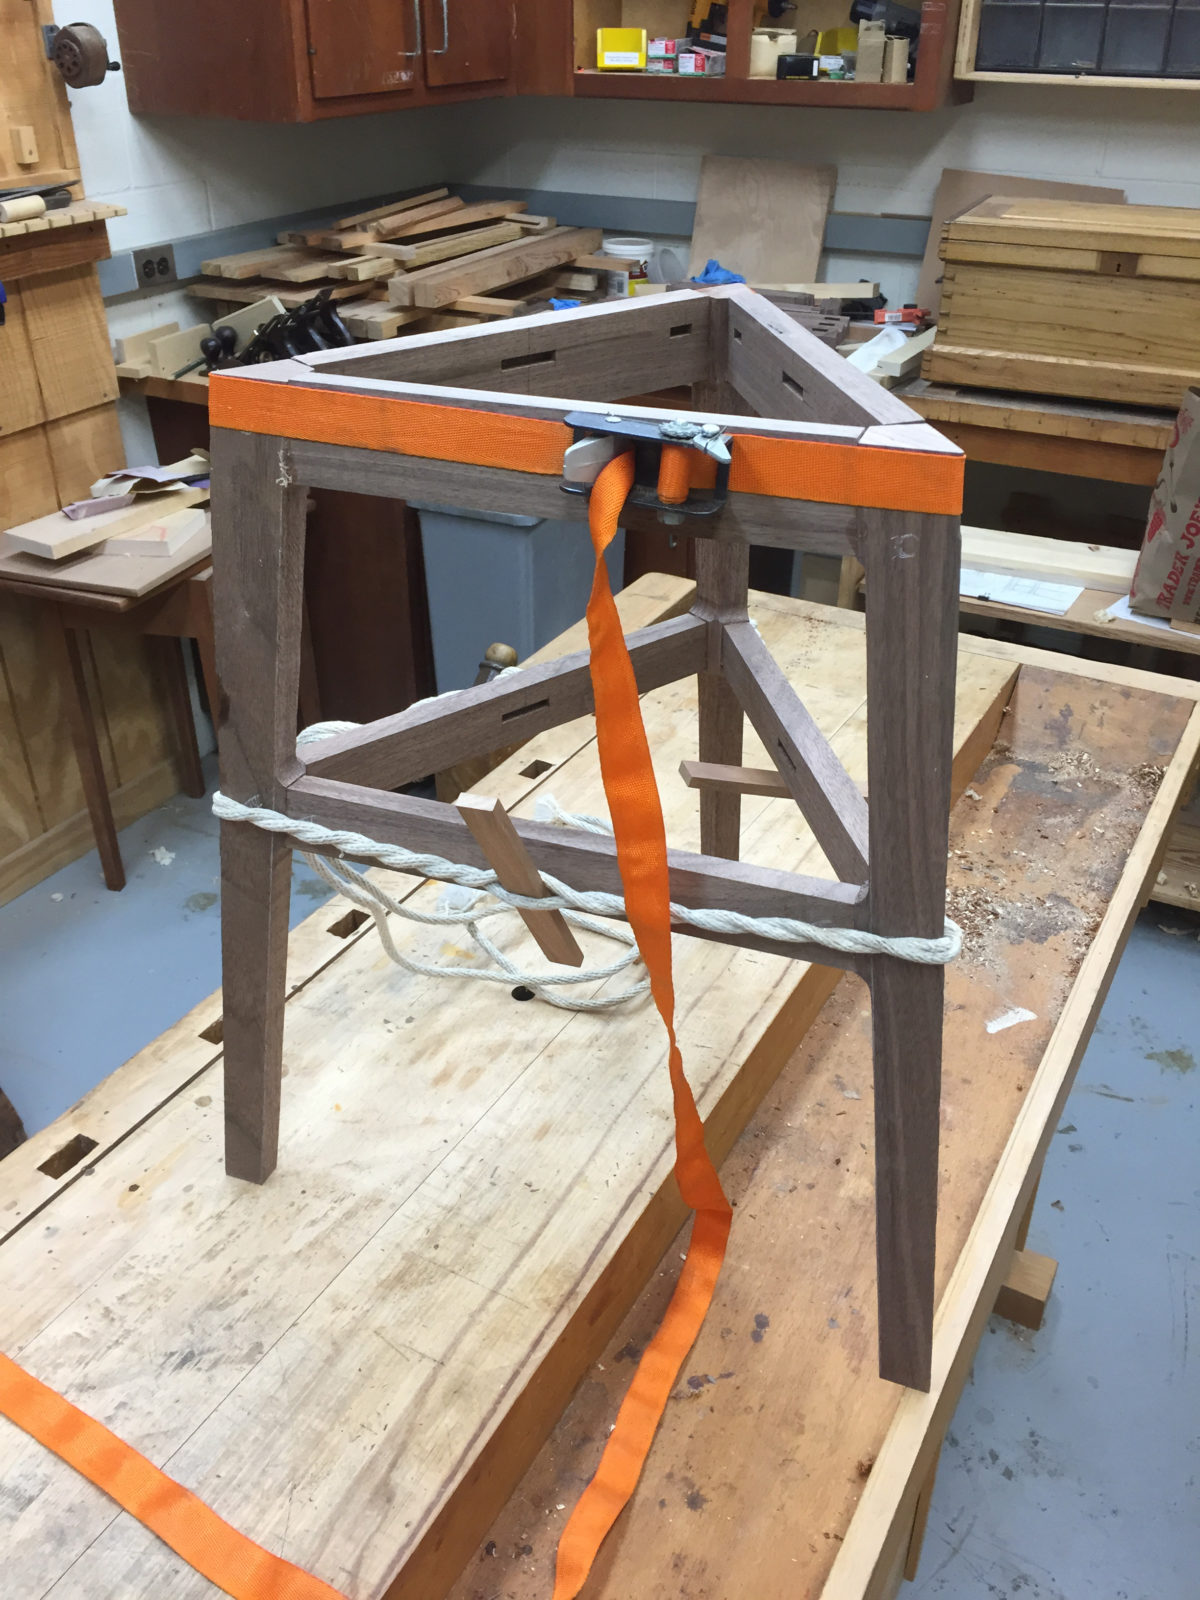
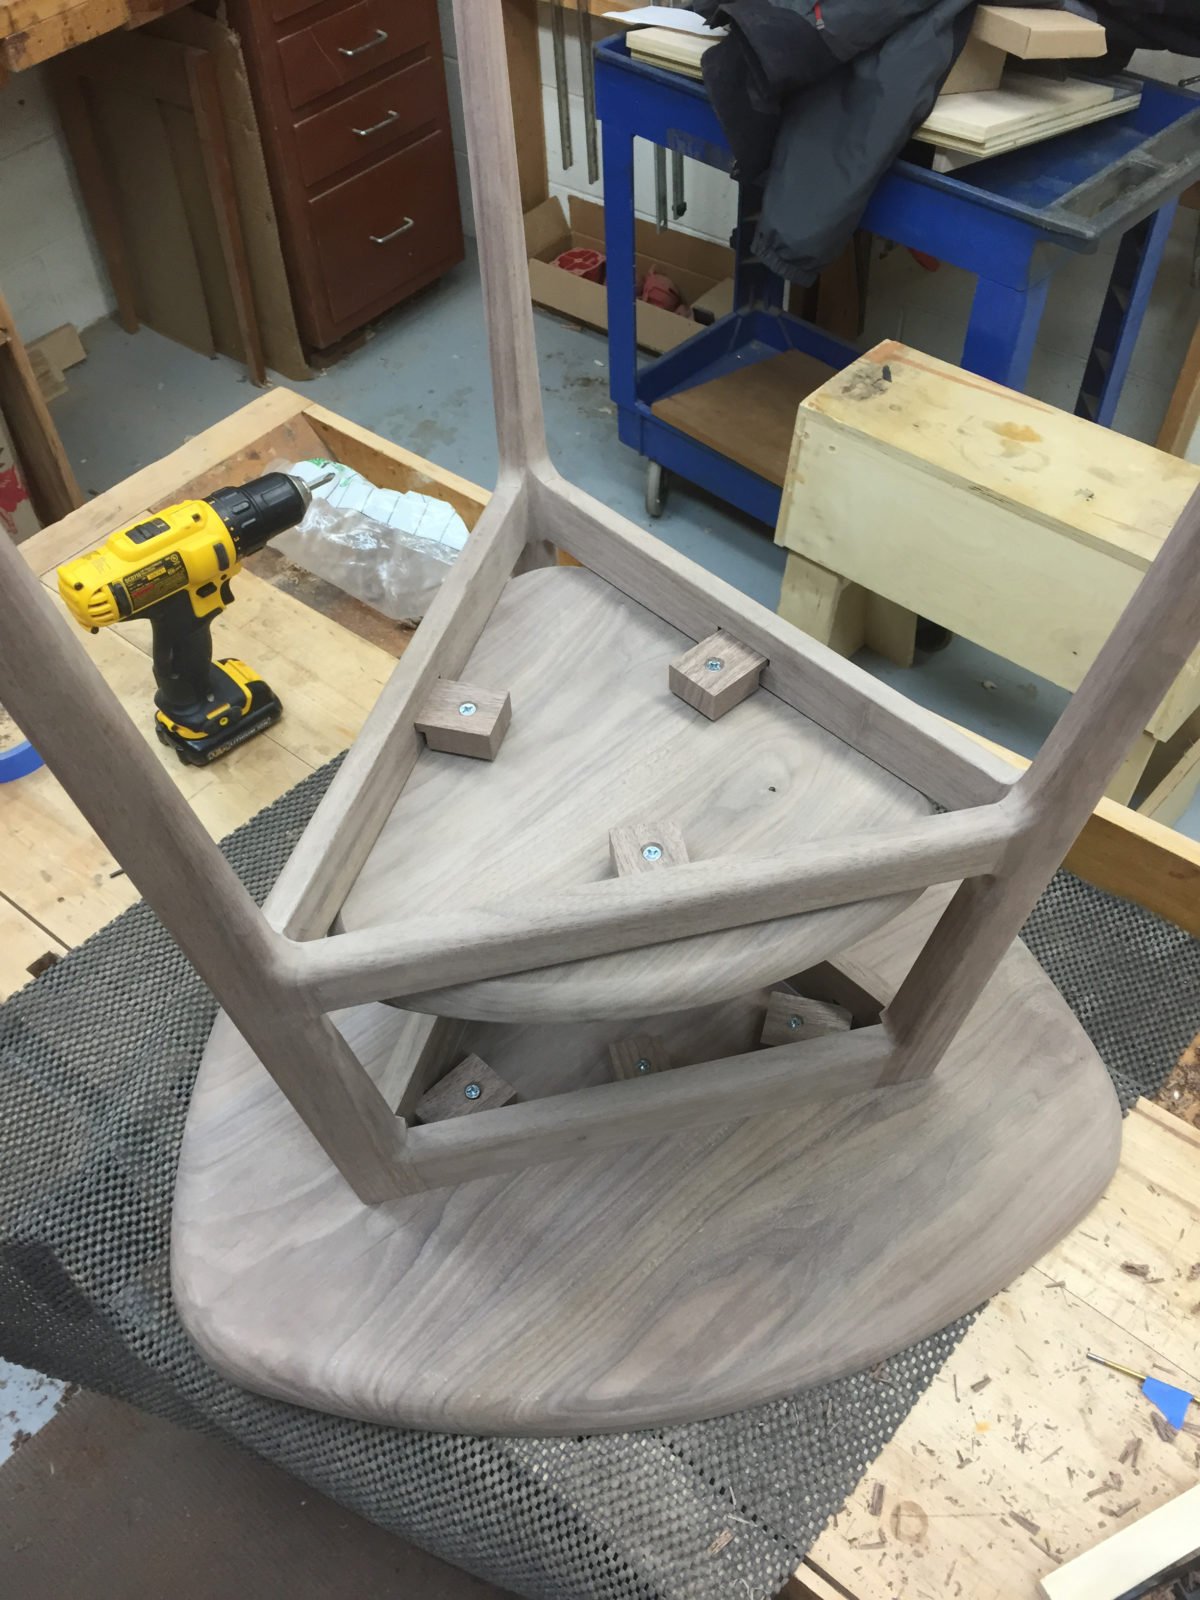
9) After a dry-fit, the base was glued up using a band clamp and a makeshift rope clamp that was tightened by twisting a small piece of wood between the rope.
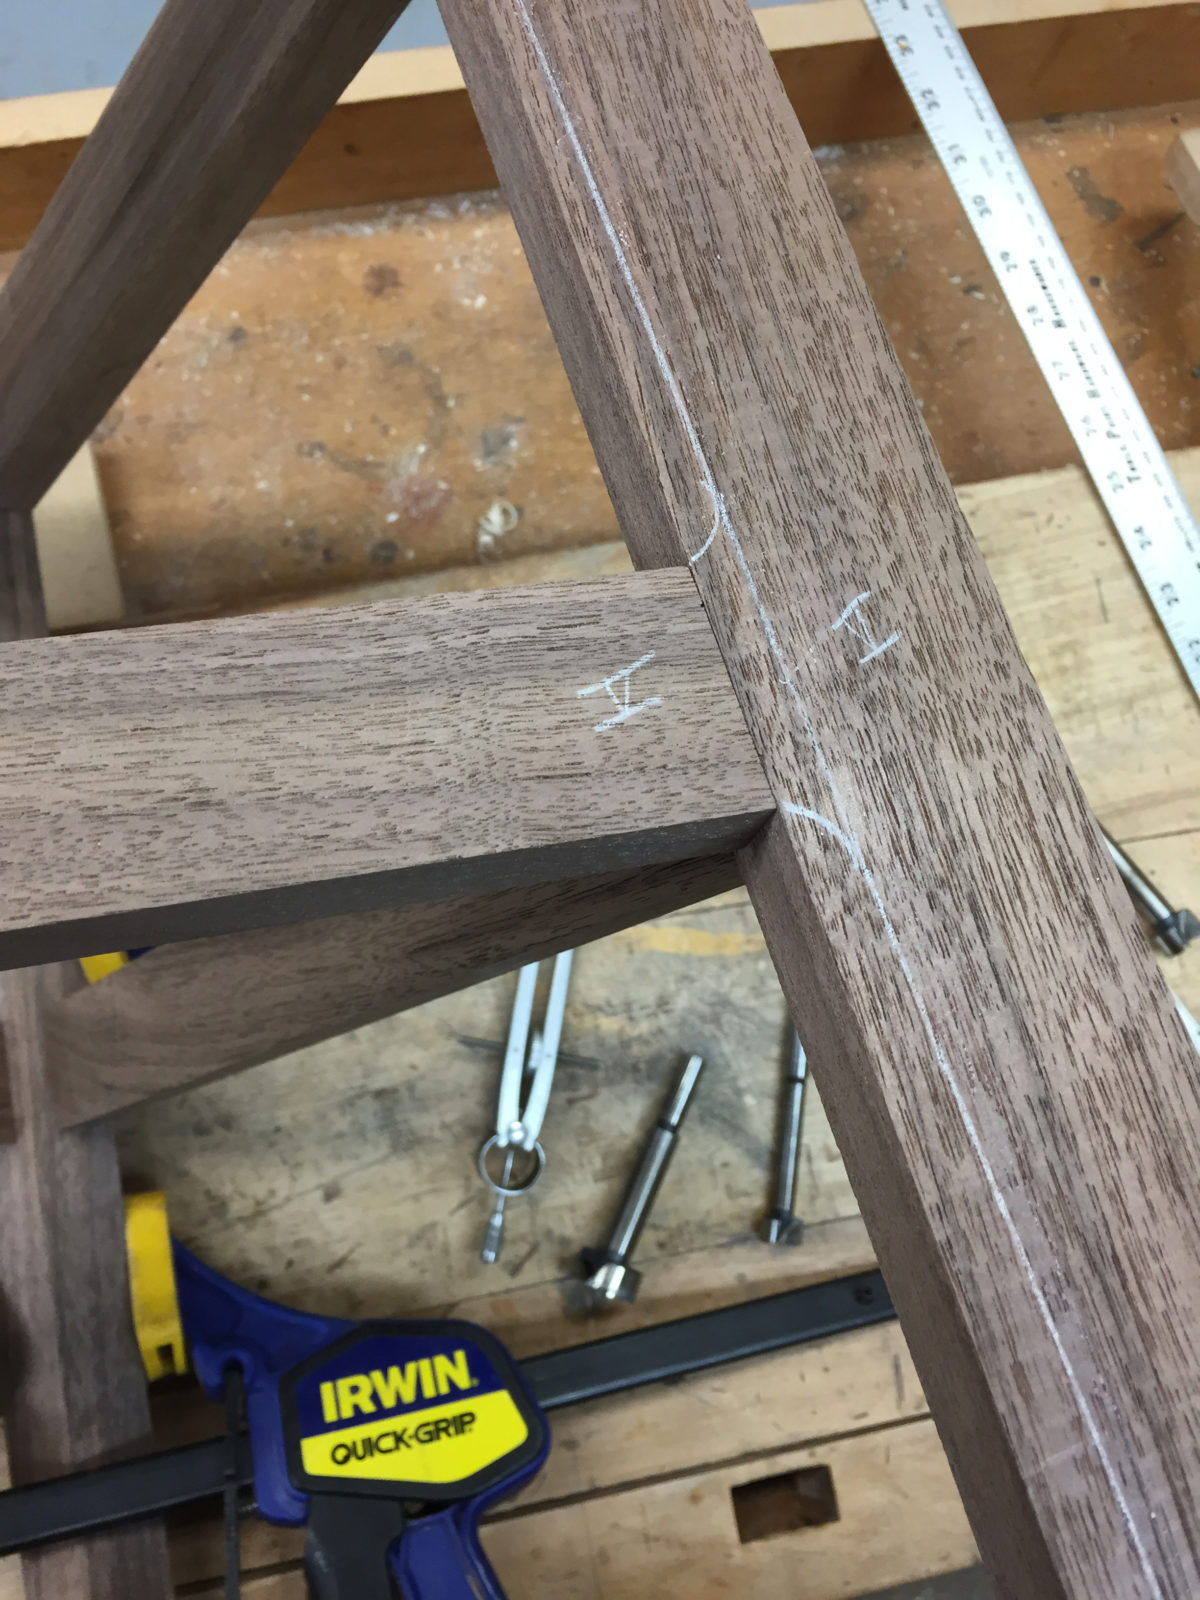
5) The legs for the base are triangular in shape with flats to join the apron and stetchers. The mortises were cut at a 90 degree angle to the inside faces of the legs and the tenons were cut at a 6 degree angle. The top and bottom of the legs were cut at a 7 degree angle to lean in towards the center.
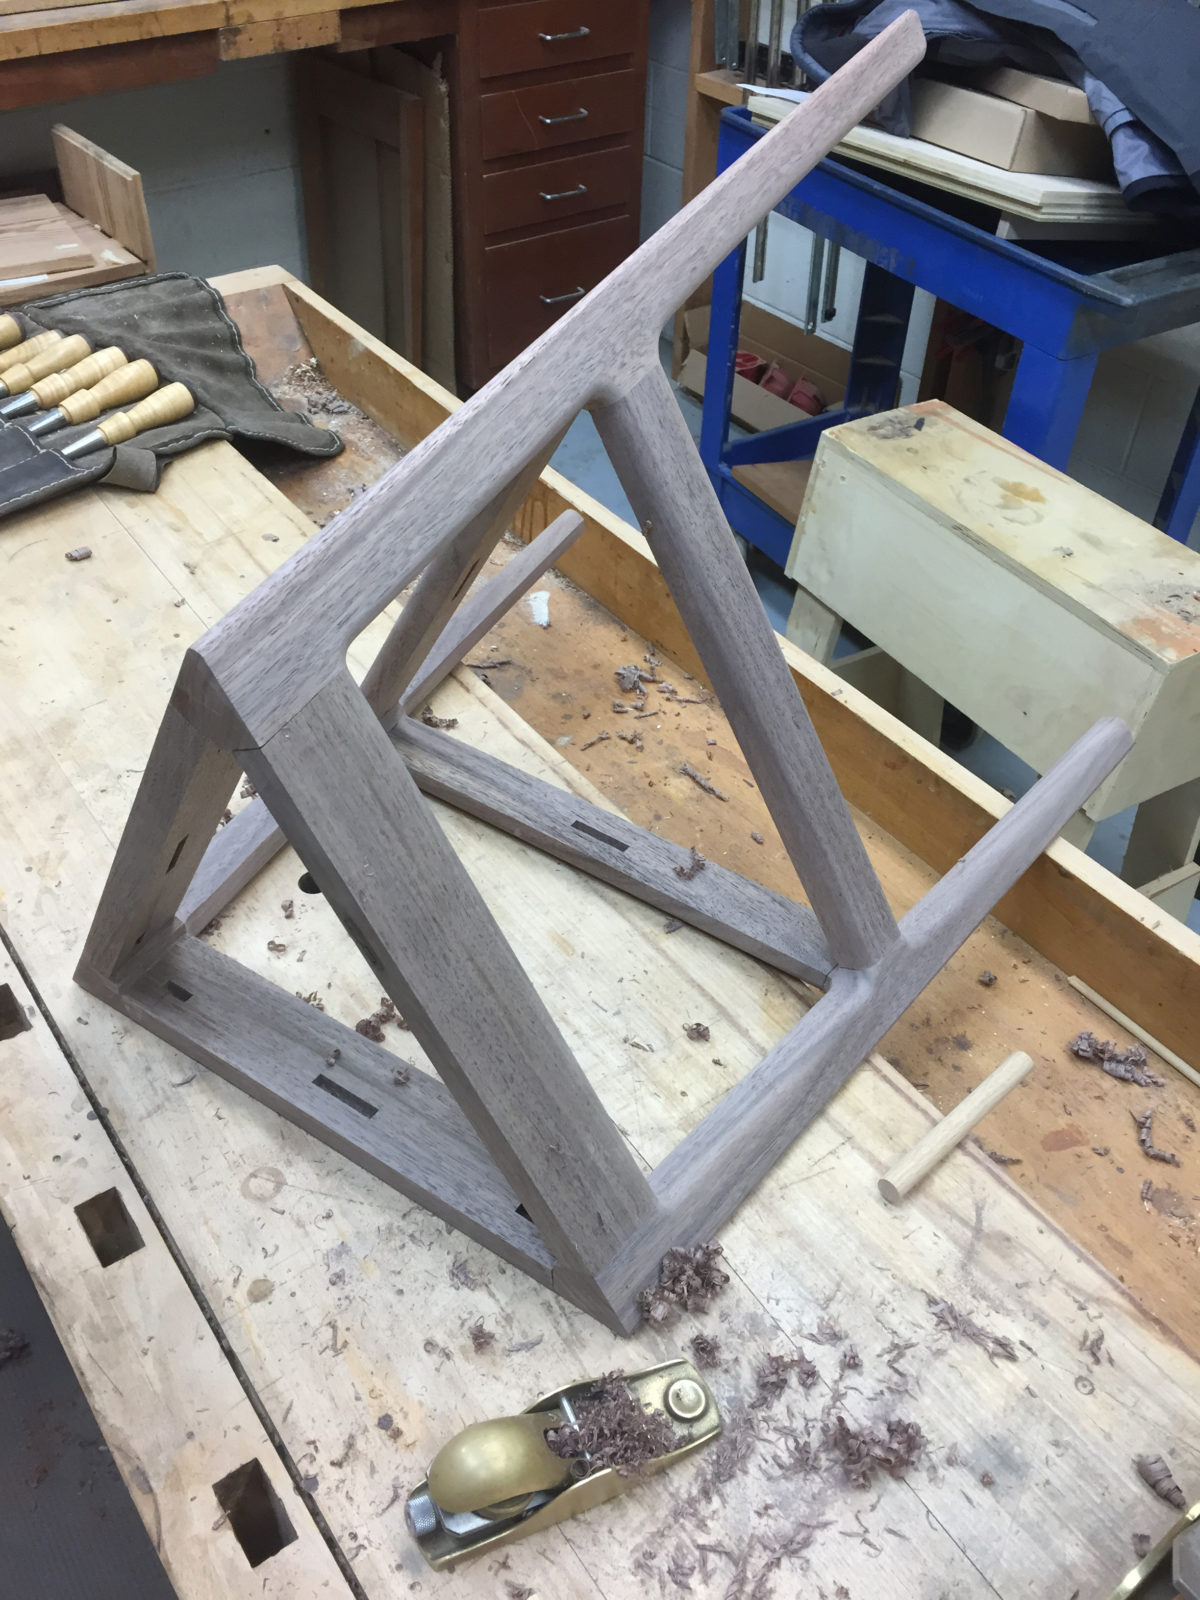
10) I started some of the round-overs with a router, followed by files and an apron plane.
11) The inside of the leg-to-stretcher joint was also carved out, and then all joints were faired using fine files and sandpaper wrapped around various sized dowels.
12) I rounded over the bottom of the shelf and top, and then assembled the table using walnut buttons.
1) The lumber used is all locally sourced air-dried walnut. Here's a photo of the finished table.
Get woodworking tips, expert advice and special offers in your inbox
I have been building something simiar since 2013, originally inspired by a FWW article a few years back. I cut the legs in a diamond shape at 60 degrees so that the joinery faces are square. My design uses full aprons (4.5" wide) and double tenons at the top and 1.25" bottom stretchers which I sometimes laminate in a curve at the same radius as the tabletop.In 2014 I added a spin drawer (garrett hack wrote about in FWW several years ago) then later I did a few with slatted shelves.
I enjoy doing bookmatch tops and shelves, so try to get those whenever my materials cooperate. You can see some of these at my website: http://www.eggtoothoriginals.com
I really like the way you have sculpted the legs and framework on your piece...Maloof-style...thanks so much for sharing this lovely design.
Hi 51woody,
I finished the table with two coats of brushed-on satin poly and followed by 4-5 coats of wipe-on poly. And then a coat of dark wax on the top. Thanks!
John
This is almost an adaptation of a Reuleaux triangle. This triangle is based upon an equilateral triangle. At each vertex, two 60 degree circular arcs are created. One arc has a radius of r and the other has radius of r + s where s is the side of the equilateral triangle. Each arc is subtended by the extended sides of the equilateral triangle. The circular arcs are respectively tangent at the intersections with the extended sides. Such a Reuleaux triangle obviously is of constant breadth and easier to create than the elliptic arc mentioned in the article. Greenlee Brothers Tools once made a rotary cutter based on such a triangle that would cut a hole of nearly square section for mortising applications.
Donwaldrop,
I don't have a PDF of the measured drawings, but it is 23 inches wide by 22 inches tall. A few other key dimensions would be that the lower shelf is 13 inches from the floor and 12 5/8 inches wide at it's widest point. The top is 7/8 in thick and the shelf, apron and stretchers are all 3/4 in thick. Hope that helps.
John
51woody,
I used Minwax satin poly. The same brand for both the brushed on and wipe-on. The oil based finish really brings out the color of the air-dried walnut.
John
Can you give me the dimensions of the legs? I want to try to make this for a family friend and I have a good amount of Walnut flooring to plane down and use. I already played with the geometry of the shelves on paper and have a scale drawing done.
Hi user4483020,
Sorry I didn't see your question earlier. The legs are equilateral triangles with 1 3/4 inch sides. The foot has 7/8 inch sides, leaving the outside edge straight and shaping the inside edges. Hope they helps!
John
Loving the look of the air-dried walnut. The triangle-shaped base is a nice touch and the entire construction overall also reminds me of the Reuleaux triangle, which you are right- is a true exercise in geometry.
He’s built dozens of round Shaker stands over four decades, so there is no one more qualified than Christian Becksvoort to demonstrate making this classic. In this seven-part video series,…
Our biweekly podcast allows editors, authors, and special guests to answer your woodworking questions and connect with the online woodworking community.
Get woodworking tips, offers, and expert advice in your inbox
Follow
UNLIMITED
Become an UNLIMITED member and get it all: searchable online archive of every issue, how-to videos, Complete Illustrated Guide to Woodworking digital series, print magazine, e-newsletter, and more.

 Apr 01, 2015
 This project is a great excercise in geometry. The top and shelf are based on an equilateral triangle with circles drawn at each of the three points. An ellipse then connects each of the circles, rounding the sides as they connect to the edge of each circle.
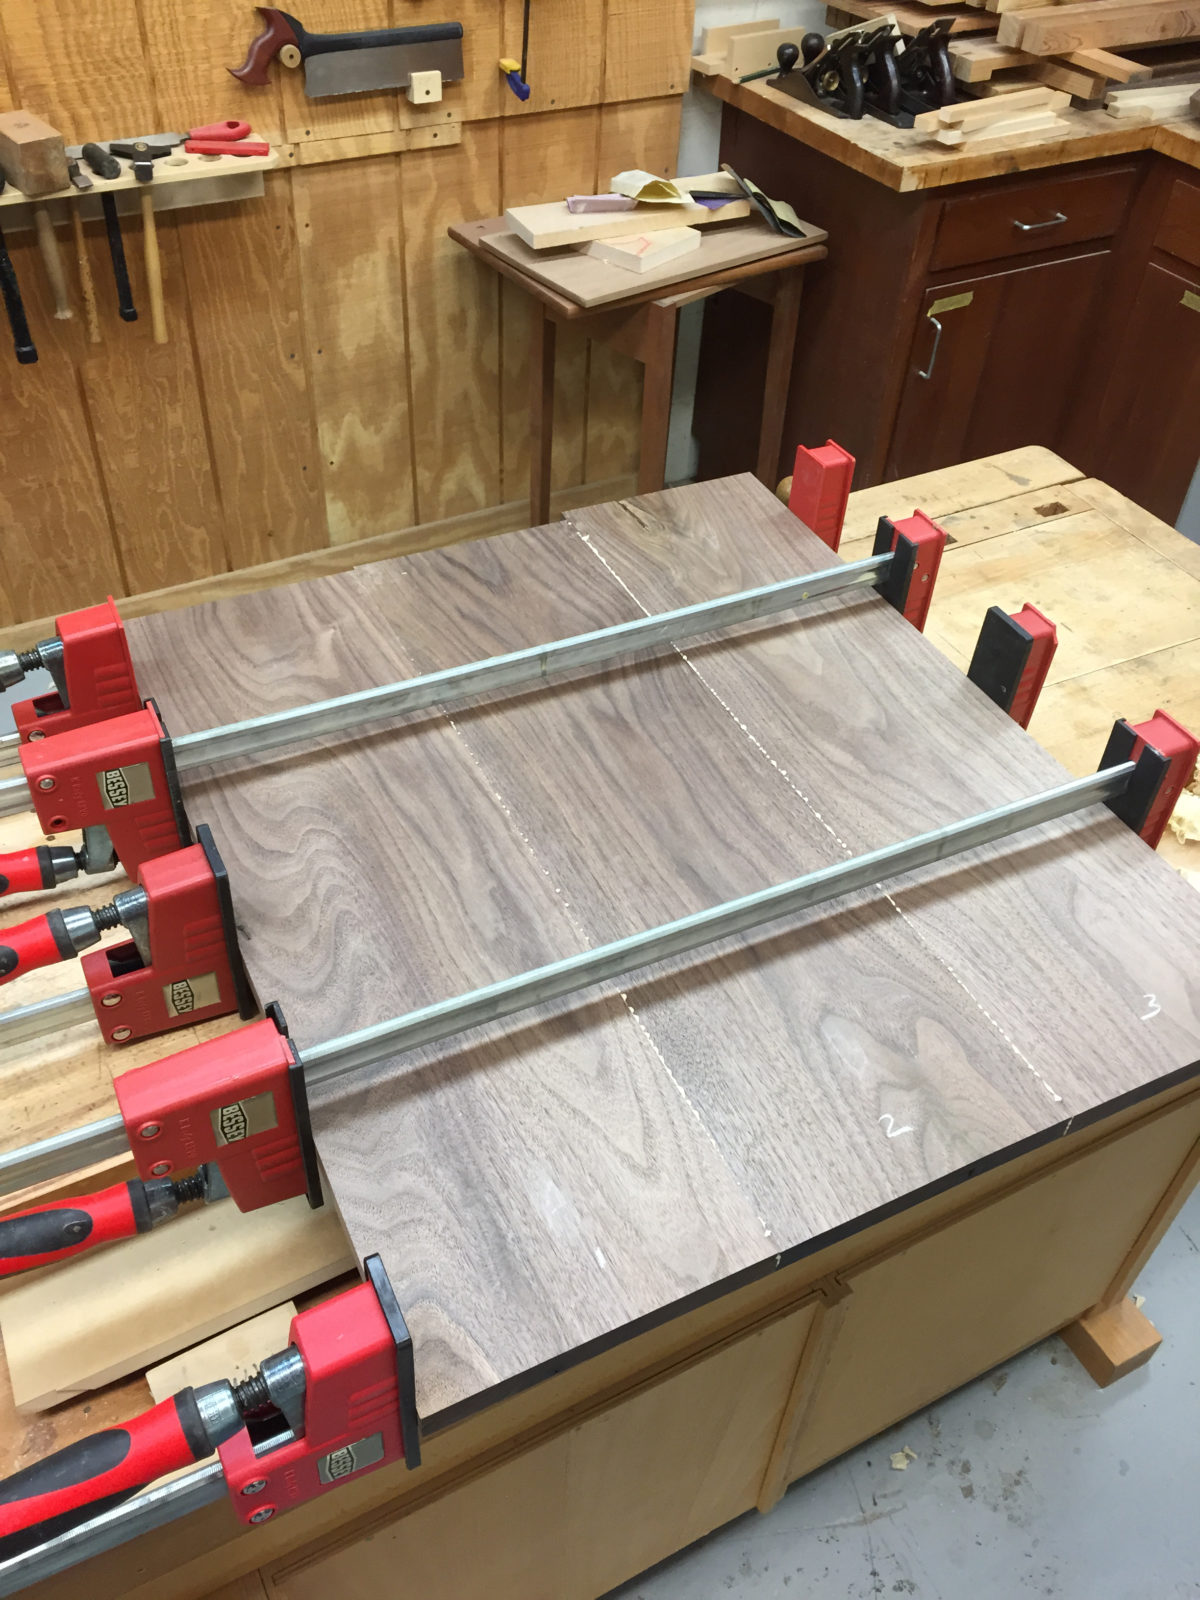


Comments
Great table but please tell how it's finished.
I have been building something simiar since 2013, originally inspired by a FWW article a few years back. I cut the legs in a diamond shape at 60 degrees so that the joinery faces are square. My design uses full aprons (4.5" wide) and double tenons at the top and 1.25" bottom stretchers which I sometimes laminate in a curve at the same radius as the tabletop.In 2014 I added a spin drawer (garrett hack wrote about in FWW several years ago) then later I did a few with slatted shelves.
I enjoy doing bookmatch tops and shelves, so try to get those whenever my materials cooperate. You can see some of these at my website: http://www.eggtoothoriginals.com
I really like the way you have sculpted the legs and framework on your piece...Maloof-style...thanks so much for sharing this lovely design.
Hi 51woody,
I finished the table with two coats of brushed-on satin poly and followed by 4-5 coats of wipe-on poly. And then a coat of dark wax on the top. Thanks!
John
This is almost an adaptation of a Reuleaux triangle. This triangle is based upon an equilateral triangle. At each vertex, two 60 degree circular arcs are created. One arc has a radius of r and the other has radius of r + s where s is the side of the equilateral triangle. Each arc is subtended by the extended sides of the equilateral triangle. The circular arcs are respectively tangent at the intersections with the extended sides. Such a Reuleaux triangle obviously is of constant breadth and easier to create than the elliptic arc mentioned in the article. Greenlee Brothers Tools once made a rotary cutter based on such a triangle that would cut a hole of nearly square section for mortising applications.
The construction description is helpful, but for us real amateurs, do you have a pdf of the measured drawings?
Hi, do you recommend any particular brand of poly and I assume it's oil based? Thanks!
Donwaldrop,
I don't have a PDF of the measured drawings, but it is 23 inches wide by 22 inches tall. A few other key dimensions would be that the lower shelf is 13 inches from the floor and 12 5/8 inches wide at it's widest point. The top is 7/8 in thick and the shelf, apron and stretchers are all 3/4 in thick. Hope that helps.
John
51woody,
I used Minwax satin poly. The same brand for both the brushed on and wipe-on. The oil based finish really brings out the color of the air-dried walnut.
John
Can you give me the dimensions of the legs? I want to try to make this for a family friend and I have a good amount of Walnut flooring to plane down and use. I already played with the geometry of the shelves on paper and have a scale drawing done.
Hi user4483020,
Sorry I didn't see your question earlier. The legs are equilateral triangles with 1 3/4 inch sides. The foot has 7/8 inch sides, leaving the outside edge straight and shaping the inside edges. Hope they helps!
John
Loving the look of the air-dried walnut. The triangle-shaped base is a nice touch and the entire construction overall also reminds me of the Reuleaux triangle, which you are right- is a true exercise in geometry.
What are the lengths of the aprons and stretchers?
Thank you.
Is this not a cricket table?
Log in or create an account to post a comment.
Sign up Log in