Workshop Tip: For perfect mortises, upgrade your edge guide
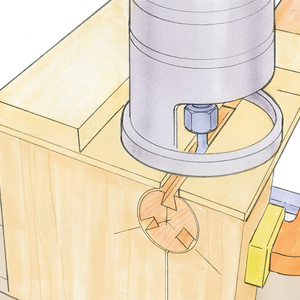
This router mortising jig captures the workpiece between two fences.

While building a trestle table for our church, I tried using my router’s edge guide to cut the large mortises. It proved difficult to keep the edge guide tight to the workpiece while pushing the router down and forward at the same time. Any small wobbles showed in the final result. And even on these wide beams, the setup felt a bit tippy and dangerous.
So I upgraded the edge guide to capture the workpiece between two fences, creating a versatile mortising jig that works on a wide range of workpieces. Two adjustable bridges connect one fence to the other.
First, I screwed a long wood fence to the fence on the edge guide, as I always do. Next I slotted the bridge pieces and screwed them permanently to the first fence. Then I epoxied threaded inserts into the second fence to accept bolts and clamp knobs. I made my own clamp knobs by embedding a 1/4–20 carriage bolt into the top of a shopmade wooden knob, fixing it in place with a nut, but you can also buy premade clamp knobs with screws attached.
To use the jig, push the first fence against one side of the workpiece and then slide the other fence against the other side of the workpiece—just snug enough to allow the jig to slide freely. Tighten the clamp knobs. With the fences hugging the workpiece, you can slide the router back and forth on the rods to center the bit over your layout marks. When it looks good, tighten the lock screws on the rods, and set the desired mortise depth on your plunge router.
Rout the mortise in 1/4-in.-deep passes for best results, stopping by eye at the ends of the mortise. For perfectly centered mortises, just rotate the jig 180° after the first pass and make another.
I made pretty tall fences for my large workpieces, but you can replace those with smaller ones, or add longer bridges for even larger workpieces. The jig works like a dream at any size, keeping the router solid and straight and delivering perfect mortises every time.
Click here to enlarge the illustration.
—JIM MORGAN, Smyrna, Tenn.
Illustrations by Dan Thornton
From Fine Woodworking issue #285








Comments
I don't understand what guides the router? It looks like the rods are just stops of some sort?
The rods are clamped into the router base. This design basically is adding a long auxiliary fence to the router’s specific edge guide, then adding another aux fence to the opposite side of the workpiece.
Many of us have accumulated several router fences from different brands of routers, so consider using 2 fences face-to-face using the same pair of rods. I found that the DeWalt and Bosch routers have fences with the same spacing for their 10.5 mm ~ 3/8" rods, and their supplied rods are very close in diameter. If you have a wide workpiece e.g. fitting a wagon vise in a bench top, just pick up a pair of 6 ft rods and cut to size.
Log in or create an account to post a comment.
Sign up Log in