A Simple Way to Upholster Chairs
Slim, comfortable slip seat works for most chairs and uses common materials.
In the November/December 2003 issue of Fine Woodworking (#166), Garrett Hack explains how to build “A Side Chair in Ash,” covering joinery, shaping, assembly — everything but the slip seat.
That topic was covered in Fine Woodworking issue #163 in an article by Michael Fortune. For those inspired by Hack to build the chair but lacking back copies of the magazine, here is Fortune’s article so the project can be completed.

In 1979 I spent five months designing and making a prototype dining chair that I hoped would be comfortable for three or four hours at a time. Part of that effort involved creating an upholstered seat that was up to this formidable task but was thin enough that it would not overpower the chair’s design. Simply gluing foam to a plywood seat was not only uncomfortable but also had all the grace and style of a muffin top. What resulted was a simple upholstery detail that I have used in a wide variety of chairs ever since, in thicknesses up to 2-1/2 in. And my original seat has held up nicely these 24 years. 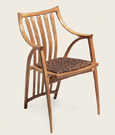 An upholstered slip seat complements a beautiful chair. Using modern materials, it’s not difficult to construct an elegant seat that will remain comfortable for decades. An upholstered slip seat complements a beautiful chair. Using modern materials, it’s not difficult to construct an elegant seat that will remain comfortable for decades.
Slip seats are an upholstered, padded alternative to solid wood or woven seats, offering greater comfort and a range of looks as endless as the variety of fabrics available. Another advantage is that they can be removed easily for reupholstery. In the past, slip seats were made using traditional upholstery techniques and materials, such as horsehair. I use simple techniques and commonly available, modern materials without compromising the look and feel of a well-made traditional seat.
My slip seat consists of three different densities of foam on a thin plywood platform (see Seat anatomy), which is slotted to allow it to flex and conform to the person using the chair.
Cut slots in the seat platform
I use 1/4-in.-thick plywood for the seat platform of dining chairs, while larger chairs that are designed to be used in a living room may have 1/2-in.-thick platforms. I always use Baltic-birch plywood for seat platforms because it has more laminations than other plywoods and the core is free of voids and quite strong. 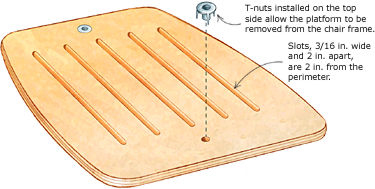
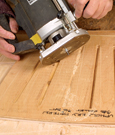 Slots add some give to the stiff material. These can be cut a number of ways, but Fortune prefers to use a template-guided router for consistent results.
Cutting a series of slots front to back on the platform makes it much more flexible and thus comfortable. The slots are 3/16 in. wide, approximately 2 in. apart and extend to within 2 in. of the perimeter. Then install T-nuts on the top side, which allow the upholstered platform to be attached and removed as needed.
For an inset slip seat like the one shown here, the platform should come up 1/8 in. short all around the inside of the seat frame. Foam and fabric added later will fill the gap.
Build up the foam layers
Moving from bottom to top, the foam layers go from high- to low-density (firm to soft). The closed-cell, high-density styrene foam used as the base layer of the seat is sold as sleeping-pad material for camping. It is available at camping-supply stores in thicknesses ranging from 1/4 in. to 3/4 in. To attach and laminate the foam pieces, I use spray adhesive, following the directions on the can for a permanent bond.
Put down a base layer of dense foam
Start the upholstery sequence by determining how thick (and comfortable) you want the final upholstered platform to be, then choosing the appropriate thicknesses of foam to get you there. For a dining chair, a final thickness of 1 in. to 1-1/4 in. is appropriate, so I start by attaching a layer of 1/4-in.-thick high-density styrene foam to the plywood platform. (The fractional sizes given here are approximate, because the materials I buy in Canada come in metric sizes.) Thicker seats can be made simply by increasing the thickness of this base layer and building up the outer band of firm foam that follows. 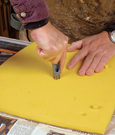
Apply the foam oversize, then trim it with a knife, scissors or the bandsaw (fine-tooth blade) so that it is proud of the plywood by 1/16 in. The next step is easily overlooked (to the embarrassment of the person sitting down in the chair), and that is to provide some air vent holes in the foam. Locate the slots in the plywood and, using a 1/2-in.-dia. hole punch, create five or six vent holes around the surface for air to escape. Without the vent holes, the upholstered insert becomes a whoopee cushion.
Add an outer band of high-density foam — To avoid the rounded, muffin-top look, the next step creates a firm dam around the perimeter of the seat. This is done by attaching a band of high-density foam, about 1/2 in. thick by roughly 1-1/2 in. wide. If you are unable to find 1/2-in.-thick material, you can build up layers of thinner material.
It is important to bevel the inside edge of this outer band to ease the transition between the high-density styrene foam and the medium-density urethane foam that will fill the center. Without the bevel, the change in firmness will be too abrupt.
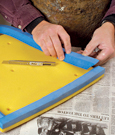 The high-density foam can be cut on the bandsaw with a fine-tooth blade. First, cut strips 2-3/8 in. wide. Then tilt the table to 45° and rip the strips into equal parts. Attach the front piece first, followed by the sides and finally the back. Bevel the ends of the pieces so that they mate nicely with each other.
Fill the center with urethane foam — The next step involves filling the center with medium-density urethane foam. I get low- and medium-density urethane foam from a local fabric store.
For the center section, use urethane foam that is slightly thicker than the dense foam used for the outer band. For a perimeter thickness of 1/2 in., for example, I recommend that the urethane foam be 5/8 in. thick. 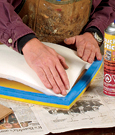 Start at the corners. Using spray adhesive on all of the mating surfaces, attach the corners of the center section of medium-density foam to the corners of the high-density outer band.
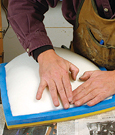 Work in toward the middle of each edge. Be careful to mate each square edge of the center section as smoothly as possible with the beveled edge of the outer band.
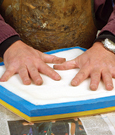 Last, press down the center section. Working from the edges toward the center, compress the softer, oversize center section as evenly as possible.
Cut the foam about 3/8 in. bigger than the opening all the way around and leave the edge square — not at a 45° bevel. Spray adhesive on one side of the urethane foam and on its edges. Then spray the center surface of the seat, including the 45° edge but not the remaining top surface. Attach the square-cut edges of the urethane foam to the 45° edges of the band, working in from the corners. The center of the urethane foam will form a bubble. Press down the bubble into the center area in a uniform manner. There may be small bumps around the edges, but these will be evened out in the next step.
Add one last layer
The next step is to wrap the surface in 1/4-in.-thick, low-density urethane foam. Lay the seat platform upside down on a piece of thin urethane foam cut about 2 in. larger all around. Spray the exposed 2-in. band of foam and the edges of the platform, and then lift the foam so that it bonds to the edges, avoiding large wrinkles at the corners. Lay a knife flat on the plywood and trim the excess foam flush to the surface.
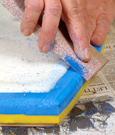 First, ease the edges of the dense outer band. This material is easily machined, sliced and sanded.
 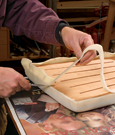 A final layer of foam smooths the bumps. Lay the seat platform upside down on 1/4-in.-thick low-density urethane foam. Apply glue only along the sides of the platform and the exposed foam. Then pull up the foam evenly against the sides, being careful to avoid bumps and gathers.
Cover the platform
The seat platform should be wrapped with thin, neutral-colored cotton muslin in preparation for the upholstery fabric. The cotton muslin can be stretched lightly with medium effort and stapled to the underside of the platform, followed by the upholstery fabric. A good hand stapler will work, but an air-powered stapler that shoots narrow staples is much easier to use, particularly if you intend to make a lot of upholstered chairs. I use a Haubold stapler with 1/4-in.-long wire staples, which tend to drive in completely, holding the fabric firmly.
Care has to be taken to read the upholstery fabric. There may be a pattern that should be kept centered or stripes that should be kept straight. If the fabric has a nap, it should point toward the back of the chair so that the person using the chair is less inclined to slide out. Use only upholstery fabric to cover a slip seat. Fabric made for clothing or drapery will become threadbare quickly.
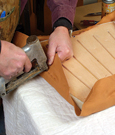 The first fabric layer is cotton muslin. Stretch the fabric across the middle, from front to back, placing a few staples in the middle of the front and back edges. Then stretch it side to side and attach it the same way.Staple the upholstery fabric the same way. The two tabs of white tape indicate the alignment of the stripes.
 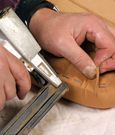 Work toward the corners, a few staples at a time. When you are near the end of an edge, skip ahead to the corner before doubling back to fill in the staples between. This should help you avoid deep wrinkles.
The fabric is attached in much the same way that an artist’s canvas is stretched onto a frame: Start in the middle, stretching the fabric front to back, and tack down just the center of the front and back edges. Then stretch the fabric side to side and tack down the middle of the side edges. Now work toward the corners, adding a few staples at a time as you move outward. The tension used to stretch the fabric should be equal on all sides. When you reach the corners, pull the fabric around tightly, trying to avoid overlaps and wrinkles. Finish off this upholstery job by covering the bottom of the platform with black polyester cloth.
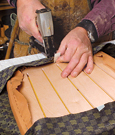 Staple the upholstery fabric the same way. The two tabs of white tape indicate the alignment of the stripes.
 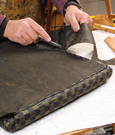 Last, cover the back with black polyester. Staple it down and trim the excess.
The slip seat can be supported in a number of ways, depending on the application. Most of my chairs have slip seats that are fully or at least partially set into the seat frame. To support these, I glue a plywood ring into the seat frame. It serves two purposes: supporting the seat platform and strengthening the seat frame. Like the seat platform, the thickness of the plywood seat ring is determined by the overall size of the chair. As the seat frame is assembled, the ring is set into a deep groove about 5¼8 in. below the top edge. Then the upholstered platform is squeezed into the space above the ring, hiding the edges of the platform.
An alternative to insetting a slip seat into a seat frame is to let the upholstered platform hang over the front rail of the seat frame. In this case I usually attach a curved wood lip under the front edge of the platform, strengthening it and creating a plush look. If the slip seat must overlay the seat frame, it can be attached to wood blocks that are glued inside the frame.
To attach the seat platform to the wood blocks or plywood ring, you must locate the attachment holes. I cut pieces of 1/4-20 threaded rod about 3/4 in. long and sharpen one end of each by filing it. To mark the location of the platform T-nuts, I thread the sharp bolts into the T-nuts and press down the upholstered platform into position. Then I drill the clearance holes in the seat ring and attach the slip seat with round-head machine screws.
The result is a smooth, seamless, low-profile seat that will remain comfortable for many years.
From Fine Woodworking #163, pp. 54-58



Log in or create an account to post a comment.
Sign up Log in